A Simple Tutorial to Safely Cutting Strip Lights
An Overview of Strip Lighting’s Versatility
Strip lights, ubiquitous and adaptable, have redefined the domain of lighting solutions. They are an innovative product that marries functionality with aesthetics, providing not just lighting but also enhancing the visual appeal of spaces they adorn.
These flexible circuit boards populated by light-emitting diodes, colloquially known as LED strip lights, can be found gracing everything from chic architectural installations to quaint home decor settings. Landscape lighting in particular has seen a surge in the use of these strip lights due to their versatility.
Landscape strip lights can be used to subtly highlight pathways and patios or create dramatic effects by illuminating trees and garden structures. Furthermore, they come in various colors and brightness levels, allowing for endless creative possibilities.
But what amplifies the allure of strip lights is their customizability. They can be cut into specific lengths to meet precise requirements, a capability that manifests itself most distinctly when one asks: Where can we cut strip lights?
The Importance of Cutting Strip Lights Properly: Ensuring Optimal Use and Safety
Cutting LED strip lights at correct points is crucial for their optimal performance and longevity. Every inch along its length is laden with minuscule electronic components that culminate seamlessly into a line marking called the ‘cutting line‘. This brings us to another frequently asked question: What is the cutting line on LED strip lights?
It’s simple: a cutting line demarcates where you can safely sever your LED strip without damaging its circuitry or compromising its functionality. Incorrectly cut strips can lead to electrical faults causing flickering or dimming effects while operating; more alarmingly, they may also lead to complete failure, resulting in wasted resources both financially and materially.
Therefore, understanding where to cut LED strip lights is a prerequisite for anyone intending to use these versatile lighting options. Additionally, the safety factor cannot be overstressed. A wrongly cut LED strip can increase the risk of electrical short circuits and fires. It’s vital to ensure you’re cutting these strips correctly not just for their optimal functioning but also for your safety as well as those around you.
So, whether it’s an architect looking to cast a warm glow on a sprawling property with landscape lighting or a hobbyist planning their next project with LED strip lights, understanding where and how to cut these lights is of paramount importance.
As we delve deeper into the specifics of cutting strip lights in the subsequent sections, remember that your safety and the optimal performance of your lighting solution are ultimately tied together – underscored by one simple yet essential act: cutting the strip light at its designated points.
Understanding the Spectrum: Different Types of Strip Lights
Emerging as a popular choice for both indoor and outdoor lighting, strip lights have revolutionized the world of lighting. However, not all strip lights are created equal. The three primary types are LED strip lights, neon flex strip lights, and RGB strip lights.
LED Strip Lights: Brilliance in Simplicity
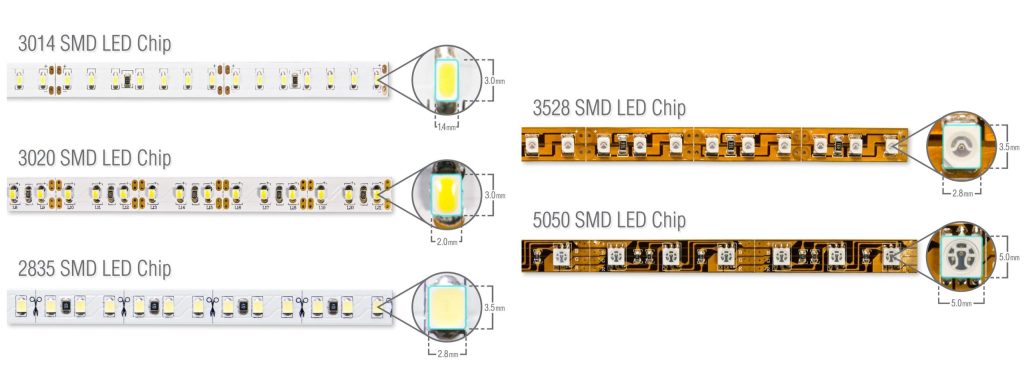
The first type to be discussed is light-emitting diodes strip lights. These consist of numerous small LEDs mounted closely on a flexible circuit board. Typically used for task lighting or accenting specific areas, they offer a myriad of benefits, including energy efficiency and a long lifespan.
Due to their low heat emission, businesses as well as homeowners find them suitable for various applications like under-cabinet lighting or landscape strip lights. The question often arises: Where to cut LED strip lights? The answer lies in understanding their structure, which we will delve into later.
Neon Flex Strip Lights: Vintage Vibes with a Modern Twist
Moving on to neon flex strip lights – these provide an excellent solution for those looking to emulate the classic glow of neon tubes without the high voltage requirements or fragile glass components. Neon flex strips consist of diffused silicone tubes that evenly distribute light across their surface, giving them that characteristic ‘glow’. While cutting these can be slightly trickier than their LED counterparts, with careful attention it can still be achieved effectively.
RGB Strip Lights: A Kaleidoscope at Your Control
Last but not least are RGB (red-green-blue) strips; these allow users to adjust colors according to their preference, making them ideal for mood or themed lighting scenarios. Since an RGB system combines multiple LEDs in one housing unit, you may wonder, where can we cut these strip lights? Again, the answer lies in understanding the anatomy of these versatile lights.
Inspecting the Infrastructure: Anatomy of a Strip Light
The physical structure of strip lights is integral to their functionality. To use them effectively, one must understand their basic anatomy: circuit board, LEDs, resistors, and cut lines.
Backbone of Brightness: Circuit Board
The circuit board is essentially the backbone of any strip light. It’s a thin, flexible piece that holds all other components together in a straight line. The board serves as the electrical highway, allowing current to flow from one end to another, thereby illuminating all LEDs consistently. It also provides physical support, allowing the strip lights to be flexible yet durable for installation around corners or curves.
LEDs and Resistors: Symbiotic Luminosity
Soldered onto these circuit boards are hundreds or sometimes thousands of miniature LEDs combined with resistors. The LEDs serve as the light sources, while resistors control current flow, ensuring each LED receives just enough power without getting burned out.
Cutting Lines: Slice with Precision
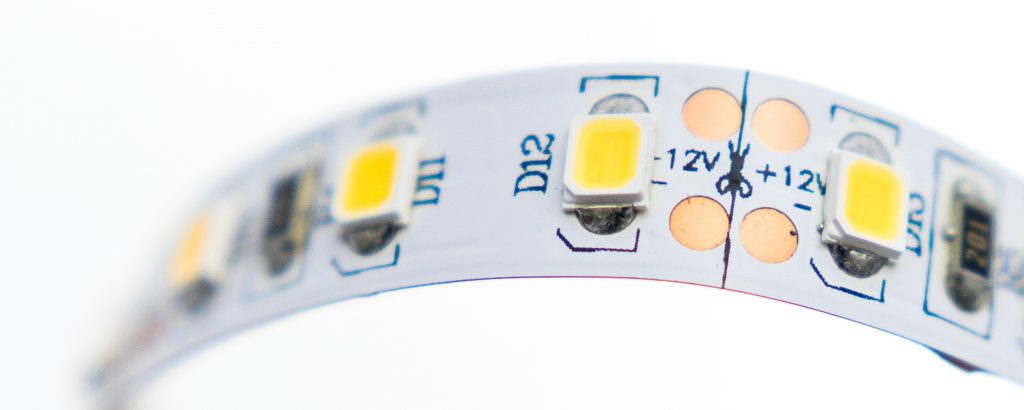
Now we come back to the initially posed questions: ‘What is the cutting line on LED strip lights?’ or ‘Where can we cut strip lights?’. Cutting lines are clearly marked lines on every type of strip light that indicate safe points to trim your strips without damaging their circuitry.
These can often be recognized as copper dots spaced evenly along every LED on your strips. Whether you’re using them for landscape lighting or decorative purposes, knowing where to cut will ensure longevity and performance remain uncompromised.
Preparing to Cut Strip Lights: The Necessary Tools and Precautions
Before embarking on the task of cutting your strip lights, it is crucial to ensure that you have gathered all the necessary tools. Precision is key in this task; hence, a pair of sharp scissors or a utility knife is imperative.
Further, a ruler or measuring tape will be indispensable for making accurate measurements before making your cut. This is particularly significant when installing landscape strip lights, as precise lengths are often needed.
Safety cannot be overstressed when dealing with electrical components such as strip lights. Always ensure that the strip light is powered off and unplugged from any power source before starting your cut. Wearing protective gloves can also prevent any accidental nicks or cuts during the process.
The Art of Cutting Strip Lights: Understanding and Identifying Cut Lines
To answer the common question, ‘Where can we cut strip lights?’, one must understand what a cut line looks like on these devices. On most strip light models, including LED ones, you’ll find small copper dots spread evenly along the length of the light strip; these are your cutting points or ‘cut lines’. What does the cutting line on LED strip lights look like?
The cut lines are typically marked by a scissor icon accompanied by a line across copper dots located at regular intervals along the tape light reel. It’s essential to remember that you should only ever make cuts along these designated lines to avoid damaging your lighting equipment.
Navigating Different Types of Strip Lights: Cutting LED, Neon Flex, and RGB Strips
Different types of strip lights present unique challenges when it comes to cutting them. For LED strips, begin by locating those copper dot indicators – then simply make your incision using either sharp scissors or a utility knife.
Neon flex strips pose their own unique set of hurdles; owing to their design, they require careful handling during cutting. Cuts should be made only at the end of a section, before the start of a new section.
RGB strip lights, known for their multi-colored options, have similar cut lines to standard LED strips. However, considering their multicolored feature, extra attention should be given to ensure even lighting after cuts.
Post-Cutting Measures: Connecting and Installing Your Strip Lights
After your strip light has been correctly cut to the desired length, it’s time for connection and installation. You can connect your cut strips using specific connectors or by employing soldering techniques if you’re adept at it.
Installation varies based on application but is typically straightforward once your pieces are connected correctly. Landscape lighting installations may require special considerations like weatherproofing and secure mounting in outdoor environments.
Avoiding Pitfalls: Common Mistakes When Cutting Strip Lights
Despite careful preparation and execution, some common mistakes could impair the functionality of your strip lights or even pose safety hazards. The foremost among these is cutting at incorrect places, which can damage the circuitry of light strips, rendering them nonfunctional.
Inadequate safety measures form another common mistake that can lead to unnecessary accidents during cutting or even post-installation electrical faults. Always prioritize safety by adhering strictly to precautions outlined in product manuals or professional guides.
Conclusion: Where To Cut Strip Lights?
The artistry that comes with perfectly cut and installed strip lights can indeed transform any space into an aesthetically pleasing haven – whether it’s indoor ambiance enhancement or landscape lighting brilliance you seek. With this guide, navigating through ‘where to cut LED strip lights?’ should no longer pose a challenge; instead, it paves the way for a fruitful venture into creative lighting design.
You may also be interested in the following posts: