An Easy Guide to Properly Positioning LED Strip Lights
Exploring the World of LED Strip Lights
LED strip lights, also known as LED tape or ribbon lights, are flexible circuit boards populated by surface-mounted light-emitting diodes and other components. Their design allows them to be frequently used for both functional and decorative purposes due to their versatile nature. These strips can be cut at certain points and linked with other strips, enabling a wide array of lighting possibilities.
Landscape strip lights, a particular type of LED strip light, have transformed the way we illuminate our surroundings. These outdoor waterproof lights breathe life into gardens, patios, and gazebos once the Sun has set. They provide an enchanting glow that is not too harsh or glaring; rather, it emanates a warm radiance that emphasizes the beauty of your landscape.
One key feature that sets apart LED strip lights from traditional bulbs is their ability to produce a wider spectrum of colors. This not only brightens up spaces but also allows you to change the ambiance according to your mood or occasion effortlessly.
The Significance of Proper Installation
Installing LED strip lights may seem like an effortless task, but it requires precision and understanding to ensure optimum performance and longevity. The intricate process involves several aspects, such as measuring the area where it will be installed, selecting an appropriate power source, and prepping the surface for adherence, among others.
The placement or direction in which these landscape lighting fixtures face plays a critical role in achieving desired lighting effects. Misdirected installation could result in improper light dispersion, leading to inadequate lighting or unwanted shadows.
Henceforth, ‘How should LED strip lights face?’ becomes an essential part of the landscape lighting design planning process. Furthermore, correct installation ensures efficiency in terms of energy consumption, which translates into cost-effectiveness in the long run. It ensures that no corner is left dark nor any space is overly lit, causing discomfort to the eyes.
Understanding the correct way to install and position your LED strip lights will allow you to make the most of their functionalities. Not only can they transform your space into a beautifully lit landscape, but they can also create an atmosphere that suits your aesthetic preferences and needs.
Unfolding the Spectrum: Understanding LED Strip Lights
Definition and Purpose of LED Strip Lights
LEDs, an acronym for light-emitting diodes, are diminutive but potent sources of light that transform electricity into luminosity. LED strip lights consist of these miniature bulbs arranged in a line on a flexible circuit board. Their slim and adaptable nature makes them an ideal choice for various lighting needs.
The primary purpose of LED strip lights is to offer customizable lighting solutions. The adjustable brightness levels and variety in color temperatures allow individuals to tailor their lighting environment according to their preferences or requirements. Moreover, they provide indirect, soft lighting that can emphasize particular features or create desired effects in a room.
From accentuating architectural details to providing task lighting in kitchen spaces or workshops, the applications are virtually limitless. In landscape lighting too, they lend themselves quite effectively; landscape strip lights can be used to highlight pathways, trees, or garden features at night.
Outlining the Rainbow: Different Types of LED Strip Lights and Their Uses
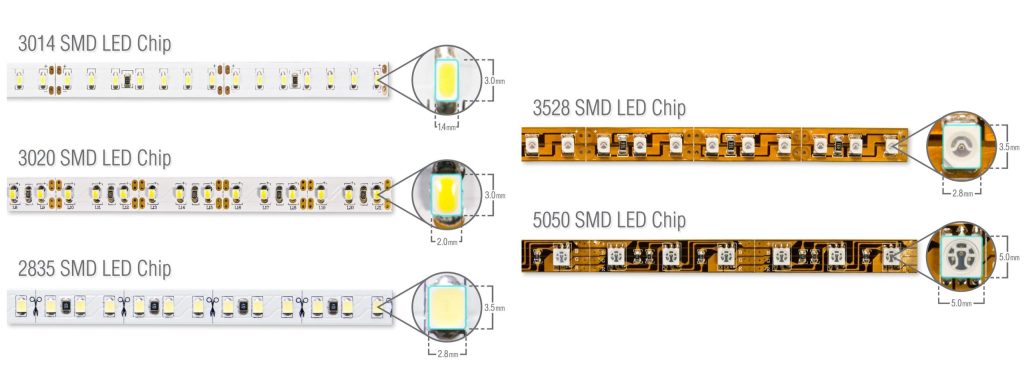
When it comes to types of LED strip lights, there are several classifications based on various factors such as color temperature, power consumption, or light intensity. For instance, SMD 3528 LEDs are known for lower light output, making them perfect for accent or mood lighting, while SMD 5050 LEDs have higher lumens, suitable for use as a main lighting source.
Single-color LEDs offer consistent monochromatic light suitable for task-oriented spaces such as workstations, whereas RGB (red-green-blue) strips use multi-chip technology, allowing users to switch between multiple hues perfect for creating atmospheric effects.
Weatherproof strips equipped with a protective casing cater specifically to outdoor applications, offering resistance against moisture and dirt; these find extensive use in landscape lighting setups where environmental resilience is key.
Then you have addressable LED strip lights capable of controlling each individual diode separately, resulting in dynamic, multi-colored lighting effects. This kind of tactical control is often used for decorative purposes in commercial or public spaces to create a visually stimulating experience.
Infrared LED strips emit light beyond the visible spectrum and are typically applied in security systems and remote controls. The versatility of LED strip light types illustrates their wide-ranging applications, from functional task lighting to artistically enhancing a space’s ambiance, including gardens with landscape strip lights.
The Essentials of LED Strip Light Installation
Essential Tools for a Seamless Installation
The fundamentals of installing LED strip lights begin with having the right tools at your disposal. First and foremost, you will need the LED strip lights themselves, which come in various types to cater to different uses, including landscape strip lights for exterior lighting.
In addition to the lights, a power source is required. This could be a simple plug-and-play power adapter or a hardwired transformer for larger installations. The choice of power source is dictated by the scale and complexity of your setup.
Next, you may need connectors if you are planning on creating bends or turns in your lighting layout. Connectors allow you to maintain continuity while bending around corners or extending along extended spaces. A remote control or dimmer switch may also be necessary if not included with your lighting kit; these provide ease in adjusting brightness levels.
To affix the LED strips securely, you might require mounting clips or adhesive tape, depending on where they are being installed. Yet importantly, general household tools such as scissors (for cutting strips to length), measuring tape (for precise positioning), and a screwdriver (for securing mounts) round out our list of essentials.
The Process: Insightful Steps towards Successful Installation
Once armed with all necessary tools, it’s time to move on to the actual installation process. Whether intentionally setting up landscape lighting or establishing ambient indoor lighting, following these steps will help ensure success.
Firstly, plan your layout carefully, considering where exactly the light should face based upon its purpose and location. Sketching out your idea can be helpful in visualizing patterns and determining how much material is needed.
Secondly comes preparing your surface; ensure it is clean, dry, and flat for optimized stability and functioning of your LEDs – this step is particularly crucial when dealing with landscape strip lights due to the outdoor conditions.
Afterwards, measure and cut your strips to length. It’s imperative to cut only along designated lines on your strip (usually marked by a scissor icon) to prevent damaging the circuitry. Once sized, it’s time for testing.
Connect your strip lights with the power source and switch them on briefly to ensure all sections are working correctly. Next, connect any necessary extensions or connectors, ensuring they match up correctly in terms of positive/negative polarity.
Then comes affixing; peel off the backing tape and press firmly onto your prepared surface. In some cases, additional clips might be required for added stability. It’s time for a power-up!
Plug in your transformer or adapter into a power outlet and marvel at the result of your handiwork. Your landscape lighting or indoor ambience should now be greatly enhanced by the addition of perfectly positioned LED strip lights.
Determining the Direction of LED Strip Lights
The Imperative Role of Space Layout
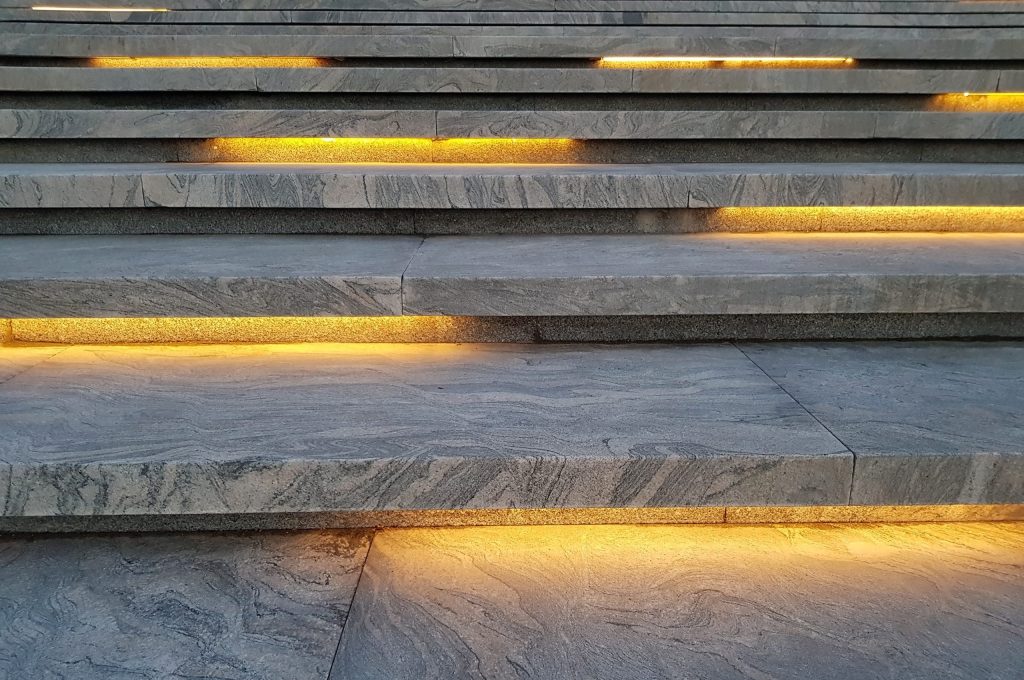
The layout of a space plays an imperative role when determining the direction LED strip lights should face. In landscape lighting, for example, the presence of trees, walls, or architectural features may influence the placement and direction of your lights. If you’re illuminating a pathway with landscape strip lights, you would want to face them downwards to adequately light up your trail.
Rooms can be complex with their unique shapes and sizes. In a rectangular room with an accent wall, you might install strip lights along the edge of that wall facing towards it to bring focus. Alternatively, in a circular room with the central furniture piece being the focal point, LED strips installed at the base could face inward for dramatic illumination.
Desired Purposes and Effects: Mood vs Task vs Accent Lighting
LED strip lights are versatile not just in where they can be installed but also in what kind of light they can provide – from delivering subtle mood lighting to purposeful task lighting or highlighting specific areas, like in accent lighting.
For mood lighting purposes – perhaps in a home theater or bedroom – LED strips might be faced upwards towards the ceiling or sideways against walls for an enveloping effect that doesn’t overpower.
Task lighting, on the other hand, requires clear, concentrated lighting, so strip lights under kitchen cabinets or over workbenches should ideally face downwards directly onto task surfaces.
When creating accent lighting – say, spotlighting artwork or architectural details – LED strip lights need to be oriented directly toward those features. It is essential here to ensure there is no seepage into other areas, which could dilute the intended effect.
Surface Material: Reflective vs Non-Reflective
The surface onto which LED strips are installed greatly affects how their light will play out. Reflective surfaces like glass, polished wood, or glossy paint can bounce light off and disperse it around the room, creating a more diffused effect. LED strips facing these types of surfaces might effectively increase the overall brightness of a room.
Non-reflective surfaces, such as matte paint or rough wood, tend to absorb light instead, causing more localized and soft lighting. With these types of surfaces, you might want to face LED strip lights towards the heart of your space to compensate for the minimal reflection and ensure adequate lighting.
General Rule: Face Towards the Area You Want Lighted
As a basic axiom in lighting design, lights should always face towards whatever area needs lighting. This holds true for LED strip lights as well. If your goal is to illuminate an entire room evenly – say, with ceiling-installed landscape strip lights – they would generally face downwards, casting light directly into the space below.
However, this rule is not immutable, and exceptions exist, especially when dealing with creative applications or specific effects desired. At times, strip lights may be faced away from the area to be lit up, like when creating wall washing or cove lighting effects where indirect ambient light is preferred.
To determine which way your LED strip lights should face requires careful consideration of many elements as outlined above. The layout of your space, intended purpose of light, and type of surface onto which you’re installing are all critical factors that will shape your decision-making process.
A Prismatic Perspective: Specific Situations and How to Face Your LED Strip Lights
Under-Cabinet Lighting in Kitchens or Workshops: Lighting Efficiency
LED strip lights, when utilized as under-cabinet lighting in kitchens or workshops, should be faced down towards the work surfaces. This positioning ensures that the light is directly illuminating the area where tasks are being undertaken, thereby providing efficient and sufficient lighting for precision activities such as chopping vegetables or piecing together intricate parts. Furthermore, facing the lights downwards minimizes unwanted shadows that could influence accuracy during tasks.
Backlighting for TVs or Monitors: Enhancing Visual Comfort
When used for backlighting TVs or monitors, it’s ideal to face LED strip lights towards the wall behind the screen. This can significantly reduce eyestrain when watching in dim conditions by creating a soft halo of light that provides contrast without causing glare on the screen. Furthermore, orienting lights this way adds an aesthetically pleasing ambience to your viewing area.
Accent Lighting for Artwork or Displays: Highlighting Beauty
Accent lighting with LED strip lights can beautifully highlight artwork or displays. The optimal way is to position them such that they’re facing towards the object you wish to emphasize. The targeted illumination accentuates details and enhances colors, bestowing a professional, gallery-like look upon your personal space.
Mood Lighting in Rooms: Sculpting Atmosphere
The direction of LED strip lights greatly impacts mood creation within a room. For a calming effect like landscape lighting, having them face upwards creates soft ambience by reflecting off ceilings – akin to the evening sky glow experienced outdoors under landscape strip lights – while facing them downwards generates focused intimacy mimicking traditional lamp light.
The Secret Sharpeners: Adjusting Light Direction with Reflectors and Diffusers
Using Reflectors to Enhance Light Direction
Reflectors can be a valuable ally in optimizing the direction of light from your LED strip. By strategically positioning reflectors opposite the direction of the LEDs, you can effectively guide the light to where it is needed most. This technique is particularly useful in larger spaces or areas with high ceilings where direct lighting may not reach as effectively.
Using Diffusers to Soften Light Output

Diffusers come in handy when there’s a desire for softer, more ambient lighting from your LED strip lights. By placing diffusers over the LEDs, you can scatter and soften their brightness while maintaining their efficacy. This creates a more gentle lighting effect that’s easier on the eyes and perfect for areas requiring mild lighting.
The Pitfalls Trail: Common Mistakes When Installing and Facing LED Strip Lights
Incorrect Positioning Leading to Glare
One common misstep during installation is incorrect positioning that causes excessive glare. This can be distressingly uncomfortable for eyes and diminishes overall visual comfort within space. To avoid this mishap, ensure that LED strips are faced towards rather than away from primary task zones or resting spots.
Not Considering Surface Color and Material When Installing
Another frequent mistake is failing to consider surface color and material when installing LED strips. Remember, lighter surfaces reflect more light than darker ones, potentially causing glaring hotspots if not accounted for; porous materials absorb light rather than reflecting it; metallic surfaces create brighter reflections and may require lower output LEDs or diffusers.
Conclusion
Correct positioning of your LED strip lights is pivotal in ensuring optimal lighting for every situation – whether it’s under-cabinet task lighting or enhancing visual comfort with TV backlighting, accentuating artwork, or shaping the mood of a room. Use reflectors and diffusers to fine-tune your lighting, and be sure to avoid common pitfalls like generating unnecessary glare or overlooking surface properties during installation. Remember, your creativity, coupled with these insights, can bring stunning effulgence to any space – much like the captivating charm of landscape strip lights skimming across an outdoor panorama!
You may also be interested in the following posts: