An Easy Guide to Installing Strip Lights
An Enlightening Introduction to Strip Lights
Lighting has the capability to alter the ambiance of any setting, subtly influencing our moods and perceptions. One particular type of lighting has recently gained popularity due to its versatility and functional appeal: strip lights.
Strip lights, also commonly referred to as LED light strips or tape lights, are flexible circuits populated with small light-emitting diodes. They come in a variety of colors and brightness levels and can be used for an assortment of home décor or practical lighting applications.
One common question posed by many is ‘How to stick strip lights?’ This query highlights one of the defining characteristics of strip lights: their adhesive backing, which allows them to be stuck onto a wide array of surfaces.
Shining Light on Various Types of Strip Lights
As with many products, there isn’t just one type of strip light; they come in several different forms. The most common types include single color, color-changing red-green-blue (RGB), RGBW (which includes an additional white LED), high color rendering index (CRI), and COB LED strip lights that offer enhanced brightness levels.
Single-color LEDs emit light in one static hue. Color-changing RGBs can emit multiple colors simultaneously, whereas RGBWs add an extra dimension by including a white diode for enhanced brightness. High CRI strips produce more natural-looking colors; they’re often used in settings where accurate color representation is crucial, such as art galleries or photography studios. COB LED strip lights are characterized by their high-density chips-on-board technology that offers superior luminosity.
The Many Benefits: A Bright Perspective
When it comes to landscape lighting scenarios or interior design strategies, strip lights have become increasingly popular due to their numerous benefits. Strip lights are energy-efficient compared to traditional bulbs since they utilize LED technology. They’re versatile and can be utilized in numerous applications, from accentuating architectural features in landscape lighting to providing task lighting beneath kitchen cabinets.
They’re also flexible and can conform to nearly any shape, which means they can be installed in locations that would have been difficult or impossible for conventional light bulbs. To add to their flexibility, ‘How to install LED strip lights?’ is a question answered with relative ease due to their adhesive backing and simple installation process.

In terms of lifespan, strip lights outshine conventional bulbs by lasting up to 50,000 hours or more. The ability of certain types of strip lights, such as RGBs or RGBWs, to change colors allows users dynamic control over the ambiance of their spaces.
Whether you’re considering illuminating your outdoor landscape with landscape strip lights or enhancing your interiors with mood lighting, strip lights offer a multifaceted solution worth considering. The ease with which these ingenious inventions can significantly transform spaces is boundless – from answering ‘How to stick strip lights?’ to exploring unique lighting designs.
Pre-Installation Ponderings: The Road to Brilliance
Before embarking on the journey of installing strip lights, there are crucial considerations one must deliberate upon. These pre-installation contemplations are key in ensuring the seamless integration of your strip lights into your desired space.
Choosing the Right Strip Lights: A Spectrum of Choices
Navigating the world of strip lights requires understanding a myriad of options available. First, one must distinguish between indoor and outdoor lights.
Outdoor strip lights typically boast greater resilience to weather elements, making them superior for landscape lighting needs. They come encapsulated in a durable silicone for added water and dust resistance – a feature not as necessary for their indoor counterparts.
Color and brightness options further enrich the choices available when selecting strip lights. From cool whites to warm yellows, these LED light strips offer an array of hues to match your spatial aesthetics.
Furthermore, certain models come with adjustable brightness settings, enabling users to tailor lighting levels according to their requirements or mood. Power requirements form another critical aspect when choosing strip lights.
Standard LED strips operate on 12V DC power, but this may differ depending on light types, such as COB LEDs, which can require different voltage levels. Understanding your specific light’s power needs is paramount in preventing issues related to underpowering or overpowering, resulting in potential damage or subpar performance.
Measuring Your Space: Igniting Precision
Once you have identified suitable strip lights that meet your aesthetic and power criteria, it is time to measure your space meticulously. Start by determining how much length you need for your application – from adding vibrancy along kitchen cabinets to creating a tranquil aura around TV consoles, the possibilities are limitless with LED landscape strip lighting.
Next comes considering placement areas; potential locations transcend both horizontal and vertical spaces, ranging from underneath cabinets to along stairways or even tracing window frames – the placement area hugely influences the length required and how you will stick your strip lights.
Applying the Adhesive: How to Stick Your Strip Lights?
One of the most frequently asked questions is, ‘How to stick strip lights?’ The answer lies in thorough surface preparation. Make sure your chosen area is clean and devoid of dust or oils that may interfere with adhesion. Most LED strip lights come with a strong 3M adhesive backing that sticks well on most surfaces, but additional support like mounting clips can be used for extra security.
Understanding these pre-installation considerations ensures not only a smooth installation process but also optimum longevity and vibrancy of your chosen light strips. Whether you’re aiming to create an ambient living space or a bright work area, having the right knowledge will light your path towards achieving a spectacular lighting paradise.
Tools Needed for Installation
Equip Yourself with Essential Tools
Before commencing the installation of your landscape strip lights, you must first gather the necessary tools. The key apparatus includes a pair of scissors, which will be useful in cutting the LED strips at marked points.
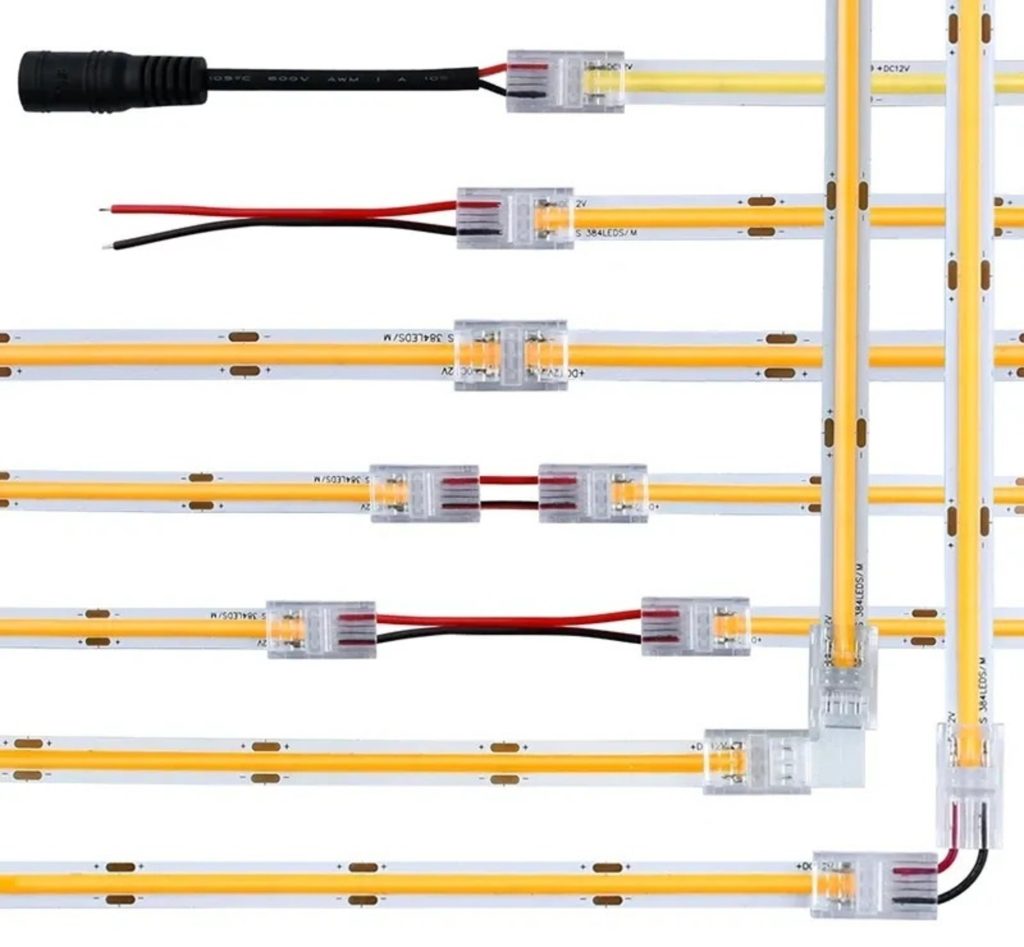
Connectors are another vital necessity to join different strips together, especially around corners or when you want to extend the reach of your lights beyond one strip length.
But most importantly, it is the power supply. Ensure it matches the voltage requirements of your chosen LED strip lights to avoid unsavory electrical incidents.
Safety First: Protective Gear
Whenever working on an electrical project such as installing landscape lighting, safety cannot be overstated. Essential safety equipment includes gloves and safety glasses. Gloves protect your hands from potential sharp edges on connectors or accidental cuts from scissors, while safety glasses shield your eyes from possible debris during installation.
Step-by-Step Guide to Installing Strip Lights
Preparing the Surface Area: The Clean Slate Approach
A successful installation starts with meticulous preparation of the surface area. Start by cleaning it thoroughly; any dust or grease could interfere with adhesive backings and curtail their effectiveness.
After cleaning, dry the surface completely, as dampness could also affect adhesion negatively. Once cleaned and dried, proceed to mark out light placement using a pencil, providing a clear guide when installing the strip lights.
Connecting to a Power Source: Understanding Requirements and Safe Connections
Understanding the power requirements of your LED strip lights is paramount in ensuring their longevity and optimum performance. Check specifications on packaging for this information before connection.
When connecting to an appropriate power source, always adhere strictly to manufacturer instructions not only for safety but also for warranty consideration should anything go awry.
Attaching Strip Lights: Sticking to Perfection
Once your surface is prepared and power is ready, proceed to peel off the adhesive backing of the LED strip lights. Begin applying them along your marked area, pressing firmly but gently to ensure they adhere properly to the surface.
Making Necessary Adjustments: Precision in Cutting and Connecting
With the landscape strip lights attached, you may find excess length at particular points. Cut these at marked points using scissors – most LED strip lights, especially COB LED strips, have clear indicators where safe cutting can be done.
In instances where corners are encountered or extension beyond one strip length is required, connectors come in handy. Follow the manufacturer’s instructions on how to use these for a seamless look.
Troubleshooting Common Issues
Flickering or Dimming Lights: How to Handle the Hiccups
At times you might encounter flickering or dimming lights after installation. Before resorting to replacement of whole strips, check connections, as loose ones are often culprits for such issues. Power supply mismatch could also lead to such complications; recheck voltage requirements against delivered power.
Strip Lights Not Sticking Properly: In Pursuit of Adhesion
Another common issue is strip lights not sticking properly. This could result from improper surface preparation prior to installation or adhesive backing losing its stickiness over time due to environmental elements.
Maintaining Your Strip Lights
Keeping Them Clean and Bright: Tips and Precautions
Proper maintenance begins with regular cleaning of your installed landscape lighting strips. Always remember to switch off and disconnect power before starting this procedure for safety reasons, and use mild cleaning solutions so as not to damage the LEDs.
Knowing When To Replace: In With The New
LED strip lights have a markedly long lifespan, but like any other product, they may need replacement after a period. Failure of sections or entire strips might necessitate this action.
Conclusion: How To Install Strip Lights?
The pleasure derived from brightening your space with LED strip lights is immeasurable. With these detailed steps on installation and maintenance, you are well on your way to adding an enchanting ambiance to your surroundings while also improving visibility.
Regardless of the few anticipated hitches, such as flickering lights or adhesion issues, the beauty of LED landscape lighting far outweighs them. So why wait? Light up your world today with landscape strip lights!
You may also be interested in the following posts: