An Easy Guide to Installing LED Strip Lights On Walls
A Brief Overview of LED Strip Lights
LED strip lights, also known as tape lights or ribbon lights, are flexible linear light fixtures that contain a series of light-emitting diodes efficiently mounted on a strip. They have evolved into an indispensable tool in the world of interior and exterior lighting, redefining the aesthetics of lighting with their versatility.
These lighting powerhouses serve a myriad of purposes. From accentuating architectural details to providing efficient task lighting in kitchens and workshops, from adding ambiance to living rooms and bedrooms to enhancing landscape lighting, their uses are as limitless as your imagination. Indeed, these slender strips can transform the mundane into magical with just a flicker.
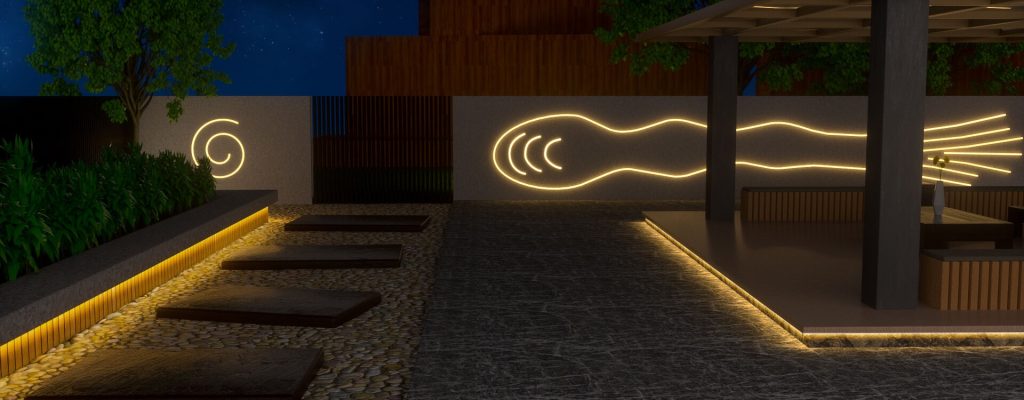
Landscape strip lights provide an effective solution for garden enthusiasts seeking to showcase their nocturnal Eden. With strategic placement along pathways or around features like ponds or statues, they can create enchanting nighttime landscapes that blend beauty with functionality.
The Benefits of Using LED Strip Lights On Walls
The benefits offered by LED strip lights are manifold. Firstly, they provide unparalleled energy efficiency compared to traditional lighting solutions – LEDs consume less power while offering brighter output. This makes them an environmentally friendly choice for those conscious about reducing energy consumption.
Secondly, most LED strips come fitted with strong adhesive backings, which facilitate easy installation on various surfaces – no more worrying over the question ‘Will LED strip lights damage walls?’ Because they’re lightweight and flexible, these strips can bend around corners or conform to almost any shape without breaking or causing surface damage.
Thirdly, the long lifespan is another significant advantage of LEDs over conventional bulbs – they last up to 50 times longer! This longevity translates into lower replacement costs, which is undoubtedly beneficial in the long run.
The fourth advantage is the customizable brightness and color variety. From warm and cool whites to a spectrum of vibrant colors, these lights can satisfy a broad range of lighting needs. Many models are dimmable, and some come with remote controls for convenient color changing or dimming.
LED strip lights provide uniform, unobtrusive lighting that’s easy on the eyes. They don’t flicker or cause shadows, which means they’re ideal for spaces where consistent lighting is required.
Purpose of the Guide
This comprehensive guide aims to assist both novice DIY enthusiasts and experienced handypersons in understanding, selecting, installing, and maintaining LED strip lights to achieve optimal aesthetic appeal and functionality. Whether you intend to add allure to your living space, enhance your landscape lighting, or simply illuminate a work area effectively, this guide will become an invaluable resource on your luminous journey.
The comprehensive guidelines provided throughout this text demystify the installation process by breaking it down into digestible steps – from understanding different types of LED strip lights to choosing suitable ones for your specific needs right up to their successful installation.
In providing answers to common concerns such as ‘Will LED strip lights damage walls?’ as well as offering handy tips like how landscape strip lights can accentuate outdoor features beautifully yet subtly at nightfall, we aim to equip readers with holistic knowledge about LEDs – leaving no stone unturned!
We believe that every reader will find this guide insightful – whether they’re planning an ambitious lighting project or just exploring ways how LEDs can brighten their surroundings while conserving energy. So let’s delve into the fascinating world of LED strip lights together!
Understanding LED Strip Lights: A Primer
Before you embark on the journey of installing your LED strip lights, it is paramount to comprehend what they are and how they function. The more knowledge you possess about these versatile lighting options, the better equipped you’ll be to create an aesthetically pleasing and efficient lighting system.
The Spectrum of LED Strip Light Types
There exists a cornucopia of LED strip light types, each with its own unique color options, brightness levels, and power requirements. While some strips emit a single color light, such as cool white or warm yellow, others offer a vibrant spectrum of colors that can be controlled via remote.
As for brightness levels or lumens, there are two principal variants: standard density with fewer LEDs per foot and high density with more LEDs per foot for brighter lighting. The former is ideal for accent or landscape strip lighting, while the latter is perfect for instances that require high-intensity lighting.
Furthermore, power requirements vary depending on the aforementioned characteristics of your chosen strip lights. As such, it’s critical to match your power supply voltage (usually 12V or 24V) with that of your LED strip lights to prevent damage.
Will LED strip lights damage walls? While this concern is valid given the adhesive backing utilized by many LED strips, rest assured that most won’t cause damage if removed carefully.
Key Components: More than Meets the Eye
An understanding of a few key components is vital as we delve deeper into the world of LED strip lights. There are three core parts: the light-emitting diodes (LEDs), the flexible circuit board they’re attached to, and the adhesive backing.
LEDs are semiconductor devices that emit light when current flows through them, essentially serving as the ‘bulbs’ in our strips. Their size can affect both brightness and viewing angle. The flexible circuit board, often abbreviated as printed circuit board (PCB), is where these LEDs are mounted. Their flexible nature eases installation around corners or curved surfaces, making them a favorite for landscape lighting.
The adhesive backing, usually composed of 3M double-sided tape, is a vital component that facilitates easy installation on different surfaces. Caution and precision during installation can help ensure the strips don’t damage walls when removed.
Color Options: Painting with Light
With LED strip lights, you possess the artistic license to play with colors. Your options range from monochrome strips that produce one specific color to red-green-blue (RGB) strips that can be programmed to display an array of hues.
For those coveting more advanced color mixing abilities, red-green-blue-white (RGBW) strips add a pure white light into the mix. This enhances the ability to create softer pastel colors and warmer tones – perfect for setting various moods in your spaces.
Brightness Levels: Luminous Possibilities
Brightness levels allow you to dictate the intensity of light emitted from your LED strip lights. Standard density strips serve excellently as accent lighting or for applications demanding subtler luminance – like landscape strip lights. On the other hand, high-density strips deliver intense illumination ideal for main source lighting or task-oriented applications like under-cabinet lighting in kitchens.
Power Requirements: The Lifeline of Your Lights
Understanding power requirements is crucial for functional and safe operation of your LED strip lights. Be it a 12V or 24V power supply – matching your power source with your LED strip light’s voltage ensures longevity and prevents overheating. By understanding these facets of LED strip lights, you will not only enhance their aesthetic appeal but also ensure efficient usage while keeping safety concerns like wall damage at bay.
Tools and Materials: Your Installation Companions
Before embarking on your journey to augmenting your space with landscape strip lights, you must first ensure that you have all the required tools and materials. Without the proper equipment, even the most adept artisan would find it challenging to complete the task efficiently.
Therefore, arm yourself with essential tools such as scissors for cutting the LED strips to their correct length, a ruler or tape measure for accurate measurements, and a soldering iron should any connectors require attention.
For materials, you will undoubtedly need LED strips. These come in various lengths and colors depending on your preference. Connectors join different strips together seamlessly, while a power supply keeps those diodes glowing. Having these at hand streamlines your installation process.
Pre-Installation: Laying Solid Foundations
The first port of call is deciding where your landscape lighting will go. Choosing an appropriate location entails considering multiple factors such as lighting needs (Do you want accent or ambient lighting?), wall material (Can it withstand adhesive?), and access to a power source (How long do your wires need to be?).
To prevent damage by LED strip lights on walls due to poor adhesion, ensure that surfaces are smooth and clean. After selecting an ideal location, turn your attention towards measuring this area accurately using either a ruler or a tape measure. This step is crucial as it dictates how much LED strip light you will need for that perfect fit.
The Nuts and Bolts of Installation
Now we arrive at arguably the most exciting part of installing LED strip lights – the actual installation process! First off is preparing the surface by giving it a thorough cleaning to get rid of dust particles, which could compromise adhesion strength later on. Upon ensuring that our surface area is spick-and-span clean comes application time!
Carefully cut the strips to match your earlier measurements using scissors, then gently peel off the adhesive backing and stick them onto your walls. If you have multiple strips, connect them using connectors or via soldering for a continuous lit effect.
To breathe life into your newly installed strip lights, connect them to a power source. However, it’s worth noting that safety should always be prioritized during this step to avoid electrical mishaps.
Post-Installation: The Finishing Touches
As we wind down our installation journey, testing the setup is crucial to ensure all LED bulbs are working correctly and that connections are secure. Should there be any troubleshoots at this juncture, refer back to the installation steps or consult with a professional electrician for technical issues beyond common understanding. A little tenacity goes a long way here!
Conclusion: How To Install LED Strip Lights On Walls?
In essence, installing landscape strip lights involves several detailed but manageable steps, from gathering necessary tools and materials and choosing an ideal location and measuring it accurately before delving into the actual installation process, followed by testing your setup. Remember not to rush through these stages, as patience yields perfection in this case.
Certainly, there might be minor bumps along the way, such as wondering, ‘Will LED strip lights damage walls?’, but with careful planning and execution coupled with unwavering attention to detail, you’ll have successfully brightened up your space in no time! This newfound skill not only adds value aesthetically but also empowers you with enhanced confidence in handling DIY projects going forward.
You may also be interested in the following posts: