A Complete Tutorial for Effectively Repairing Strip Lights
Deciphering the World of Strip Lights
Strip lights, particularly their LED variants, have revolutionized the way we illuminate spaces. LED strip lights are flexible circuit boards populated by mounted light-emitting diodes and other components that can be affixed almost anywhere. They offer a sleek, hidden lighting solution that can bring a soft glow or vibrant color to any setting.
Beyond mere functionality, these versatile lighting tools cater to various aesthetic needs in homes, offices, commercial establishments, and even landscape lighting. Strip lights condense brilliant luminosity into slim profiles that can be strategically placed for accent or ambient lighting.
The Ubiquity and Utility of Strip Lights
The importance of strip lights cannot be overstated given their vast applicability in different settings. In homes and offices, they provide indirect lighting for cabinets or workspaces and add depth to rooms with backlighting behind TV sets or artwork.
Commercially, they highlight product displays in retail stores and light up signage for businesses. When it comes to landscape strip lights specifically, they are used to enhance gardens or outdoor patios by emphasizing water features or pathways while providing safety during nighttime.
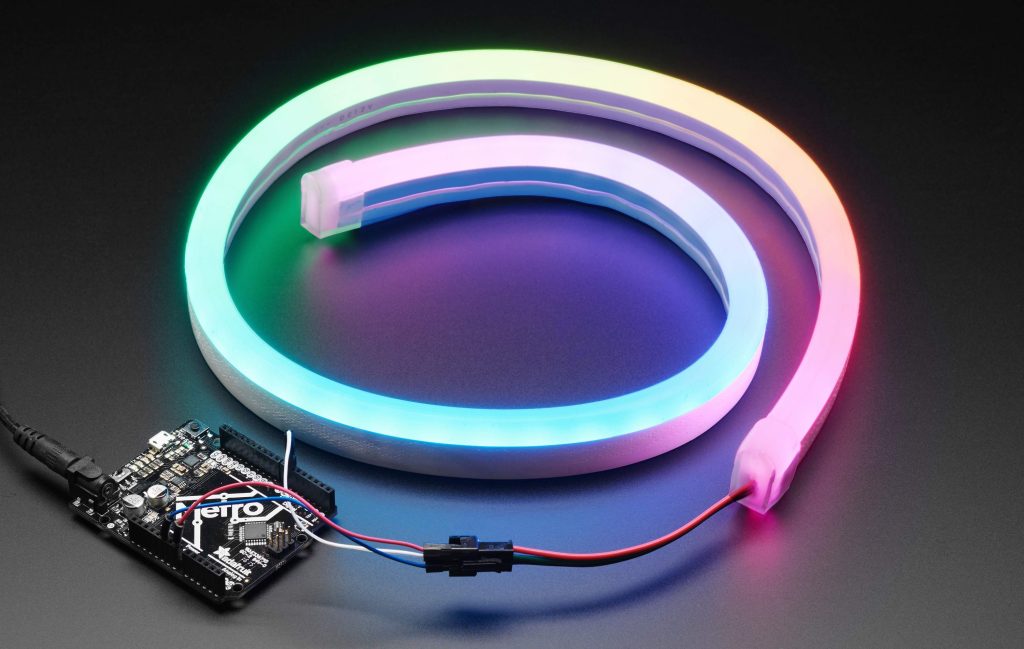
Creative designers employ colored LED strips as mood-setting tools to create immersive environments in restaurants or clubs. The flexibility provided by red-green-blue (RGB) color-changing LED strips opens up a world of possibilities for dynamic color schemes adaptable according to time of day, event type, or even synced with music.
Navigating Common Strip Light Problems
Despite their many benefits, like any piece of technology, strip lights may encounter issues that necessitate fixing. By far the most common issue is when an otherwise operational strip light suddenly begins flickering intermittently or dims significantly – signs that point towards power supply problems. Another common predicament is when a portion of the strip light or the whole thing goes out.
For RGB strips, another typical issue is color inconsistency, where certain areas display different colors from the rest of the strip. Depending on the complexity of these issues, professional help may be required. However, several straightforward fixes can be carried out by a homeowner with basic knowledge and some essential tools.
Thus emerges an intriguing question – ‘How to fix LED strip lights?’ The answer lies in understanding these lighting systems’ fundamental properties, identifying and diagnosing problems accurately, and executing effective solutions in a safe manner. This post seeks to shed light on just that – elucidating how even novices can troubleshoot and rectify common LED strip light issues with relative ease.
Peering into the Luminescence: Understanding the Basics of Strip Lights
Strip lights, owing to their compact form and versatility, have become an indispensable element in creating atmospheric lightscapes in homes, commercial spaces, and outdoor settings. Whether it’s adding a touch of brilliance to your kitchen cabinets or illuminating a path with landscape lighting, strip lights serve myriad purposes. However, before we delve into ‘How to fix LED strip lights’, it’s essential to understand what these versatile light sources are and how they operate.
The Prismatic Spectrum: Types of Strip Lights
The two most common types of strip lights are light-emitting diodes (LED) and red-green-blue (RGB). The former is renowned for its energy efficiency, longevity, and brightness. LEDs produce light via electroluminescence – a phenomenon where a material emits light when electricity is passed through it.
On the other hand, RGB strips facilitate color mixing by utilizing red, green, and blue diodes. With different intensities of these primary colors combined in various ways, RGB strips can produce an extensive palette of colors. Landscape strip lights often employ both these types to create dynamic outdoor lighting effects.
A Symphony of Components: What Makes Up a Strip Light?
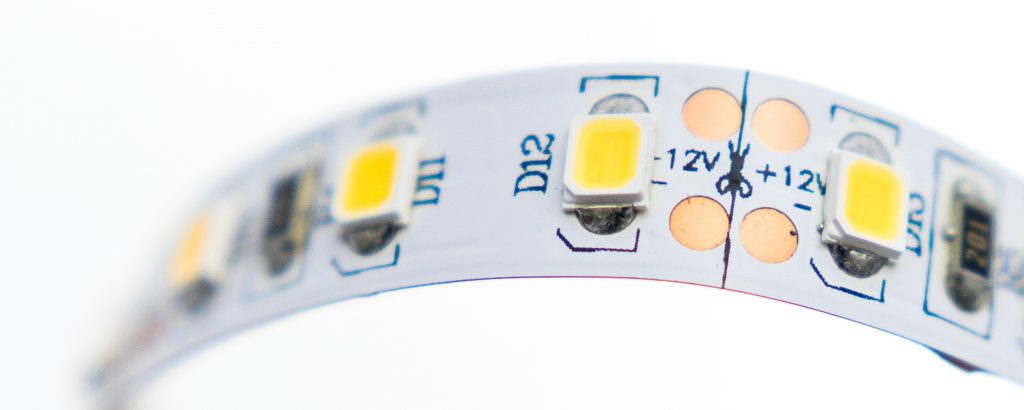
Strip lights are not just about LEDs or RGB diodes; they include several other components that come together harmoniously to produce light. Firstly, there are resistors, which regulate current flow and prevent damage from excessive voltage.
Next are connectors that allow joining multiple strips together for extended coverage – critical for extensive applications like landscape lighting. Comes the power supply unit – an essential component that converts mains voltage into a lower level suitable for powering up the LEDs.
Luminous Dynamics: How Do Strip Lights Work?
Understanding how strip lights work begins with comprehending some basic electrical principles. When electrical power is supplied, the current flows through the resistors to the LEDs, causing them to emit light – a process known as electroluminescence.
The resistors manage the voltage levels within safe limits, preventing any damage to the diodes. Changing the intensity of power alters the brightness of LEDs in single-color strips, whereas in RGB strips, different power intensities across individual red, green, and blue diodes result in color mixing.
Demystifying Illumination: The Science behind LED Lighting
LEDs operate on a principle called ‘p-n junction’. In simpler terms, an LED comprises two layers of semiconducting material. When electricity is applied, electrons from one layer jump to another and release energy in the form of photons – light particles.
In contrast with incandescent lights that heat a filament to produce light (hence wasting much energy on heat), LEDs directly convert electrical energy into light – making them an efficient choice for all applications from small indoor decor lighting to expansive landscape strip lights.
Armed with this understanding of strip lights’ fundamental operation and makeup, we are now prepared to delve into troubleshooting techniques on ‘How to fix LED strip lights?’. By comprehending these underlying principles, we can better understand what may fail within such a system, enabling us to gain more insight during our problem-solving journey through luminance.
Identifying Strip Light Problems: The Art of Detection
An essential first step in your quest about ‘How to fix LED strip lights?’ is identifying the problem. A well-functioning strip light, particularly landscape strip lights, which often serve both aesthetic and safety purposes, should emit consistent and steady lighting. However, certain disruptions may occur that indicate a need for attention.
The first common sign of strip light malfunction is flickering or dimming lights. If your landscape lighting begins to fluctuate unexpectedly in its intensity or even blink intermittently, this could signify an issue with the power supply or the LED chips themselves. The cause may range from a simple loose connection to defective LEDs or overloading of the circuit.
Another signal that your strip light requires fixing is a partial or complete outage. When certain sections of your landscape strip lights stop working entirely while others continue to function as expected, you may be dealing with ‘dead zones’. These are often caused by poor connections or faulty LEDs within those segments. Conversely, if the entire strip doesn’t light up despite being connected to power, it could indicate a more comprehensive problem such as a failed transformer or controller.
A specific concern when dealing with RGB strips is color inconsistencies. If these versatile strips start displaying incorrect colors, refuse to change color as per instructions, or show variations in color across different sections of the same strip, you have an inconsistency issue at hand. This usually stems from damaged RGB controllers but can also be due to defective LEDs.
As we delve deeper into how you can fix these problems prevalent in landscape lighting systems and general LED strips alike, remember that proper identification of issues serves as the foundation for successful troubleshooting and repair.
Troubleshooting Strip Light Issues: A Step towards Resolution
Once you’ve identified the symptoms plaguing your LED strip lights, it’s time to move towards diagnosing the cause. Troubleshooting is much like playing detective – it involves careful observation, meticulous checking, and sometimes even a bit of trial and error.
The first area to scrutinize during troubleshooting is the power supply and the various connections. Ensure that your landscape strip lights are receiving adequate power from a functioning transformer or driver. A multimeter can be used to verify this. Any irregularities here could lead to flickering, dimming, or complete outage of your strip lights.
Additionally, inspect all connections, starting from the power source up to each LED segment on the strip. Look for any loose wires or poorly connected segments that might be interrupting the steady flow of electricity across your system. A loose connection may cause sporadic functioning or even create ‘dead zones’ on your light strips.
Physical damage is another common culprit behind malfunctioning strip lights. Check for any visible signs of wear and tear along your landscape lighting strips, such as broken LEDs, frayed wires, or damaged resistors caused by adverse weather conditions or physical impact. This kind of damage can lead to inconsistent lighting effects or failure of certain sections.
In case of RGB color inconsistencies, a faulty controller might be responsible for sending incorrect signals to your LEDs, causing them to display wrong colors. Here you would need to check not just for physical damage but also for functional errors in the controller unit itself.
Troubleshooting forms an integral part of understanding ‘How to fix LED strip lights?’ It guides you towards locating and addressing what’s exactly wrong with your light strips – setting you on course towards effective repair solutions.
Tools Needed for Fixing Strip Lights
Fundamental Toolkit Essentials
The first step in understanding how to fix LED strip lights is to familiarize oneself with the basic toolkit essentials. These tools may be quite common and possibly already present in your household toolbox. One such fundamental apparatus is the humble screwdriver, which comes in an array of types, including flathead and Phillips variations. Their role is paramount in securing or freeing connections.
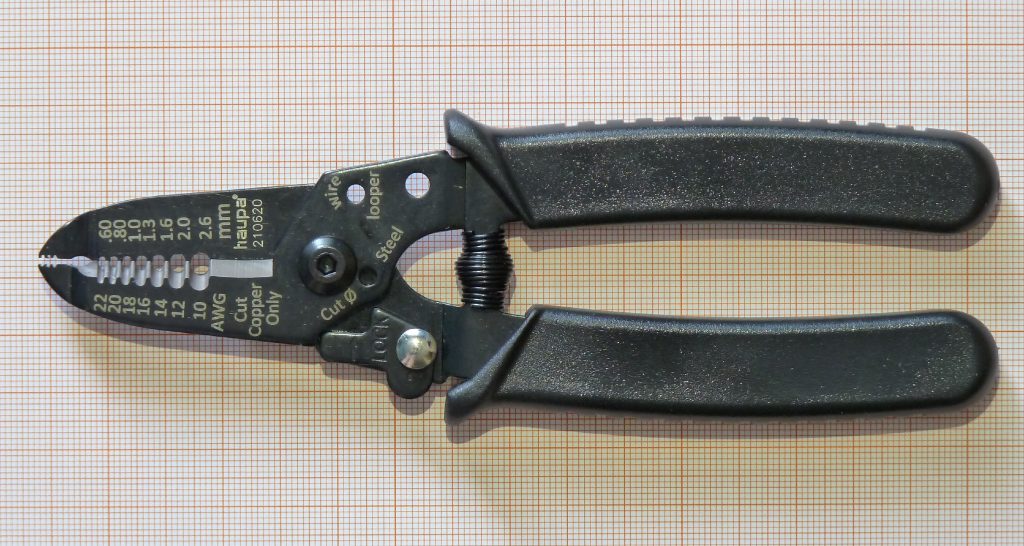
Next up, we have wire cutters and wire strippers: these are crucial for manipulating the electrical wires within landscape strip lights. Wire cutters allow you to sever unwanted or damaged segments of wire, while wire strippers provide a safe means of exposing the conductive material within a wire’s sheath without causing damage.
The last but certainly not least among the basic tools needed for fixing strip lights or any electrical devices is a multimeter. This versatile instrument measures electrical properties like voltage, current, and resistance. With this device at your disposal, you can diagnose common problems such as short circuits or broken connections that could be causing issues with your landscape lighting.
Specialized Tools for Working with LEDs
In addition to these everyday tools, there are other more specialized pieces of equipment required when dealing specifically with LED-based landscape strip lights. The soldering iron is one such tool; it’s used to join components together by melting a filler metal (solder) into the joint. Understanding how to use a soldering iron can seem daunting initially, yet mastering this tool will unlock new possibilities not just in fixing LED strip lights but also in other electronic repairs and projects. It’s worth noting that safety measures should be observed diligently while using a soldering iron due to its high operating temperature.
Following closely behind the soldering iron in terms of importance is heat shrink tubing. These slim tubes contract when subjected to heat – typically from a heat gun, though a lighter can suffice for small tubing. The tubing is used to insulate wires, providing protection and strength to the joint or connection. This method proves especially effective at preventing short circuits, ensuring the longevity of your LED strip lights.
Knowing what tools are required is crucial in resolving any issues with LED strip lights effectively and safely. Tools such as screwdrivers, wire cutters/strippers, and multimeters are must-haves in your toolbox for general electrical work. However, when dealing specifically with LEDs, particularly in landscape lighting scenarios, having a soldering iron and heat shrink tubing will advance your capacity to fix any problems with proficiency.
Step-by-Step Guide to Fixing Strip Lights: Navigating through Common Problems
A Comprehensive Walkthrough on How to Fix a Broken Connection
In landscape lighting, it’s not uncommon for strip lights to develop broken connections due to wear and tear or harsh weather conditions. The first step in fixing a broken connection is locating it. This requires close inspection of the strip light, looking for sections that are either dim or not lighting up at all.
After identifying the problematic region, disconnect the strip light from its power source. This crucial safety measure ensures you don’t risk electrical shock during the repair process. Next, using wire strippers, remove about half an inch of insulation from both sides of the broken connection, revealing clean metal wires.
The third step involves reestablishing this broken connection. With your soldering iron heated up, apply some solder to each exposed wire end until it’s well coated but not dripping with solder – this process is known as ‘tinning’. Once both ends are tinned, hold them together and gently apply heat with your soldering iron, allowing the two sections to merge back into one continuous line.
Restore power supply and test your repair job by turning on your landscape strip lights. If done correctly, the previously bad connection should now be functioning optimally.
Procedure for Replacing Faulty LED Segments
Faulty LED segments can significantly impact how your landscape strip lights look and function. After locating a faulty segment by identifying areas that aren’t lighting, start by disconnecting the power supply as a safety precaution.
Using a cutter, make incisions along the designated cutting lines on either side of the faulty LED segment. The aim here is to remove only the malfunctioning section, leaving healthy parts intact. For accuracy in cutting along these lines, use a magnifying glass if necessary.
After excising the bad segment, take note of the LED orientation on the new segment you’re about to connect. This is because strip lights only work in one direction due to the diode design of LEDs. Having identified the correct orientation, solder your new section in place using the same tinning method described earlier.
Once your LED segment is firmly soldered in place and oriented correctly, cover this joint with heat shrink tubing or electrical tape for insulation purposes. Then restore power to test whether your newly installed LED segment lights up as expected.
Tactics for Repairing or Replacing a Damaged Power Supply
The power supply stands as an integral component in how your landscape strip lights function. When it malfunctions, it disrupts the whole lighting system. Start by disconnecting the strip light from the power source before beginning any repairs.
To troubleshoot a malfunctioning power supply, begin by verifying if it’s outputting correct voltage using a multimeter. If voltage is significantly below its rated output or there’s no output at all, then indeed you have a faulty power supply.
If you’re squarely within DIY territory and possess knowledge of electronics, consider opening up the casing of this power supply (if not sealed) and inspecting inside for any visible damages like burned components or bulging capacitors, which you could replace or repair.
However, given the complexity and potential risks involved with repairing power supplies, especially if they’re high-voltage types, direct replacement might be the safest option. Ensure that the new unit you purchase matches the voltage rating and current capacity requirements of your strip lights to ensure compatibility. After connecting the new unit to the system, check that the landscape lighting functions properly – this confirms the successful replacement of the damaged power supply.
Resolving Color Inconsistencies in RGB Strips
One signature feature about RGB strips is their ability to produce a multitude of colors through the color mixing technique inherent in LEDs’ design. Color inconsistencies can arise from various reasons such as connection issues, controller problems, or even individual LED faults.
Start by checking all connections to ensure they’re properly tightened and secured. A loose connection can affect color output due to signal loss or disturbance. If all connections seem solid, direct sole attention towards the controller.
Sometimes, controller malfunctions can lead to certain colors not being displayed correctly or at all. Try resetting your controller using the manufacturer’s instructions – this often resolves minor software glitches that could be causing inconsistencies. If after resetting the controller inconsistency still persists, you might need to consider replacing the RGB strip lights, as individual LED faults are rather complex to handle on a DIY basis.
Dealing with these color inconsistencies may take a bit of trial-and-error diagnosing, but once resolved, your landscape strip lights will regain their vibrant and engaging visual appeal, which is an integral part of the landscape lighting experience.
Safety Precautions when Working with Strip Lights
The Primacy of Power Disconnection
Before embarking on the journey to answer the question, ‘How to fix LED strip lights?’, it is imperative to ensure personal safety. The first, most crucial step in any electrical repair process is disconnecting the power supply. This cannot be overstated, as any oversight may lead to a potential electrical shock hazard.
Landscape lighting, including landscape strip lights, is often exposed to external elements, leading to wear and tear. However, irrespective of their condition – be it weather-beaten or appearing perfectly sound – always disconnect the power before initiating any repairs.
Remember that electricity is invisible; hence, it’s better to err on the side of caution than risk a dangerous situation. Power disconnection stands as a cardinal rule even when troubleshooting minor issues like flickering or dimming lights. It ensures a safe environment not just for you but also protects your tools and equipment from potential damage due to sudden power surges.
Understanding how strip lights work provides an edge in identifying possible issues and their solutions but never undermines this foundational safety step. Even if your troubleshooting efforts appear fruitless initially, maintaining this safety protocol ensures you can safely reassess without peril.
After completing your repair work on the strip light – whether successfully fixing an issue or deciding to seek professional help – ensure that all connections are secure before reconnecting the power supply. This final check helps prevent accidental short circuits, which could damage newly replaced components or create new problems.
Safeguarding against Risks while Handling Tools
Handling tools like soldering irons and wire strippers requires careful attention, as these potentially hazardous implements can cause harm if misused or mishandled. A soldering iron in particular presents multiple dangers: burns from its heated tip or handle, inhalation of toxic fumes from melting solder wire, and even fire hazards if left unattended on flammable surfaces.
Therefore, familiarize yourself with the proper use of a soldering iron before embarking on fixing your strip lights. Invest in a good quality soldering stand to safely hold the iron when not in use. Always work in well-ventilated areas to avoid inhalation of harmful fumes. Wear safety glasses to protect your eyes from any spattering molten solder and gloves to guard against burns.
Wire strippers, though less intimidating than soldering irons, should also be handled carefully. Incorrect usage can lead to accidental cuts or stripped wires that short out when power is restored. Always cut away from yourself and ensure that you’re using the correct size slot for the wire gauge you’re working with.
Similar caution should be observed while using other tools like screwdrivers or multimeters. Following these safety practices not only guarantees personal protection but also ensures efficient completion of your task without causing additional damage.
Electrocution Risk: Awareness and Avoidance
Electrocution remains one of the most significant risks while dealing with any electrical repairs, including ‘How to fix LED strip lights?’. Despite strip lights operating at relatively lower voltages compared to other household appliances, they still hold potential for an unpleasant shock.
Maintaining awareness about this risk forms a critical part of your preparation process. Always treat every electrical device as if it’s live until proven otherwise; disconnect power before starting work; keep tools dry and free from moisture; wear rubber-soled shoes for extra insulation – these might seem overly cautious but are invaluable precautions against electrocution.
It’s essential that you do not attempt repair work on strip lights or any other electrical equipment if you’re alone at home. Having someone nearby capable of calling emergency services drastically reduces potential consequences in case anything goes wrong.
Never underestimate the danger posed by electricity just because it is unseen and usually unfelt. Awareness coupled with consistent safety practices constitutes your best defense against the risks of electrocution, ensuring that your DIY repair experience remains safe and satisfying.
Preventive Measures and Maintenance Tips for Landscape Strip Lights
A Proactive Approach to Strip Light Care
Maintaining your landscape strip lights is equally as important as knowing how to fix them. A proactive approach can prevent many of the common issues that necessitate repairs. Regular inspection of your lights will allow you to identify potential problems before they escalate. Look for signs of wear and tear, such as frayed wires or loose connections, which could result in flickering lights or even complete outages.
Protecting Landscape Lighting from Weather Damage
Landscape lighting is particularly susceptible to weather damage, given its outdoor location. To prolong the lifespan of your strip lights, it’s crucial to ensure they’re adequately protected from harsh weather conditions. Waterproof casings or enclosures are readily available on the market and offer an excellent investment towards this end.
The Importance of Correct Installation
Correct installation plays a significant role in preventing strip light issues. This includes ensuring that all connections are secure and that power supplies align with the lighting system’s voltage requirements – these precautions help avoid overloading that could result in dimming or flickering lights.
Maintaining Optimal Performance
Regular cleaning also contributes significantly towards maintaining optimal performance of your landscape strip lights. Dust and dirt accumulation can cause lower light output or color inconsistencies in RGB strips over time.
The Art of Maintaining Landscape Strip Lights
Knowing how to fix LED strip lights is certainly handy, but prevention, as often said, is better than cure. With regular maintenance checks and preventive measures factored into their care regimen, landscape strip lights can highlight the beauty of outdoor spaces for years on end without any significant hitches.
Though tasks involved with upkeep may seem mundane at times, every check brings us a step closer to a more vibrant and luminescent outdoor space. Like the stars that brighten up the evening sky, strip lights add a dash of brilliance to our landscapes – a brilliance we are empowered to sustain and preserve.
You may also be interested in the following posts: