A DIY Tutorial to Perfectly Cutting Strip Lights
Introduction to the Refined Art of Tailoring Light
Understanding modern lighting solutions is akin to traversing a labyrinthine expanse of technological marvels. One such spectacle within this arena is strip lights. To the untrained eye, these might seem like simple strips of luminous magic lighting spaces and places; however, they are much more than mere glowing bands. These flexible lighting systems offer a brilliant solution to an array of diverse needs.
The question arises: Can LED strip lights be cut? The answer is a straightforward yes! However, before you grab your scissors and start snipping away in reckless abandon, it’s crucial to understand the correct way to cut strip lights without damaging them or impairing their functionality.
Strip Lights: A Beacon of Versatility in Modern Lighting
One may wonder about the importance and uses of strip lights in our everyday lives. The applications are indeed multifaceted. From adding ambiance to interior spaces and underlining architectural designs to serving as efficient landscape lighting, the versatility of strip lights truly shines through.
These exquisite luminous bands have found their role not only in residential settings but also in commercial environments like restaurants, retail stores, and office buildings, as well as events and exhibitions. Landscape strip lights provide an exceptional solution for exterior environments too, bringing gardens and pathways alive at night with subtle swatches or dramatic displays of light.
The Nitty-Gritty: Defining Strip Lights
So what exactly are these versatile lighting sources? In essence, strip lights – also commonly known as LED tape or ribbon lights – comprise small individual LED emitters mounted on a flexible circuit board. Unlike traditional bulbs that cast light in all directions, LEDs emit light directionally, which can be precisely controlled, making them highly efficient for specific lighting tasks.
A pertinent point that often generates curiosity is whether these strip lights can be cut to length. Indeed they can, but it’s important to note that there are certain guidelines on where and how to cut LED strip lights to ensure they continue to work optimally post the snipping process.
Laying the Foundation: Purpose of This Guide
Given these aspects, one might inquire about the objective of this narrative. Well, the aim here is simple yet significant – to empower readers with a comprehensive understanding of how to cut strip lights correctly. This guide will walk you through all essential facets, from identifying cutting points and the actual cutting process to tips on what happens when we cut strip lights and how to fix LED strip lights when cut.
In this informative guide, we shall cast light upon not only the technical aspects but also safety measures and common mistakes often made when handling these sensitive lighting systems. It’s time now to delve deeper into this fascinating world of strip lights and learn how exactly you can tailor them in accordance with your whims and requirements.
Understanding Strip Lights
A Dive into the Luminous World of Strip Lights
Strip lights, often called LED tape or ribbon lights, are flexible circuit boards populated with light-emitting diodes. They are versatile and adaptable sources of lighting that come in a wide range of colors, brightness levels, and configurations. They can be cut to length and customized for various applications, including landscape lighting.
When considering ‘Can LED strip lights be cut?’ the answer is a resounding yes. However, it’s important to note that there are specific points along the strip where they can be safely cut without damaging their functionality. This feature contributes to their versatility and adaptability. What happens when we cut LED strip lights?
When we sever these strips at designated points, we’re able to tailor their lengths according to our specific needs without impairing their illuminating capabilities. This makes them ideal for creating bespoke lighting solutions for both indoor and outdoor spaces.
Different Types of Strip Lights
Exploring the Variety of Strip Light Options
There are numerous types of strip lights available on the market designed to suit different environments and applications. The three most common types include LED strip lights, red-green-blue (RGB) strip lights, and neon flex strip lights.
LED strip lights offer high efficiency with low power consumption, making them an ideal choice for energy-conscious individuals. Their design often allows them to produce more light output per foot than traditional light bulbs while maintaining cooler operation temperatures.
RGB strip lights enable users to adjust the color output by mixing varying levels of red, green, and blue light – these offer an extensive variety in terms of aesthetic possibilities due to customizable color profiles. Not only can they illuminate a space but also set the mood or accentuate particular features within it.
Neon flex strip lights replicate neon’s classic glowing effect but are more manageable due to their flexibility and ease of installation. These are commonly used for signage or creating striking visual effects.
Key Features of Strip Lights
Critical Characteristics: What Makes Strip Lights Stand Out
Strip lights come with a range of features that make them an appealing choice for lighting solutions. Firstly, their length can be adjusted to fit the specific requirements of a space.
‘Can strip lights be cut to length?’ is a common question asked by potential users. The answer is yes; most strip lights come with designated cutting lines, which allow users to trim them without damaging the rest of the strip.
Brightness level is another critical feature. Different models offer varying levels of brightness, providing options ranging from soft background lighting to intense lighting suitable for task lighting or highlighting specific areas in your landscape strip lights setup.
Color options are another key feature. While some strips emit a single color, others, like RGB strips, offer adjustable color outputs, allowing users to set the mood they want – be it warm, welcoming hues or cool, energetic tones.
Working Principle of Strip Lights
How Do These Light Wonders Work?
The operating principle behind strip lights is straightforward yet fascinating. Each LED (or light-emitting diode) on the tape operates independently and emits light when an electric current passes through it – this phenomenon is known as electroluminescence. The flexible circuit board that houses these LEDs has metal paths imprinted on it – these are called tracks.
When we cut LED strip lights at designed sections along these tracks, we don’t interrupt the electrical flow to the other LEDs on the tape, allowing them to continue emitting light unimpeded. Therefore, understanding ‘How to cut LED strip lights?’ and ‘How to fix LED strip lights when cut?’ becomes essential knowledge for anyone seeking customizable and versatile lighting solutions.
Preparations Before Cutting Strip Lights
A Thorough Approach to Preparing for LED Modification
It is absolutely essential to be thoroughly prepared before embarking on the task of cutting strip lights. This preliminary stage ensures that you have all the necessary tools and materials at your disposal, understand safety measures, and have a clear vision of the desired length for your landscape lighting project.
Necessary Tools and Materials
The Toolbox Essentials for Modifying LED Strip Lights
What happens when we cut LED strip lights? We need a precise set of tools. The first tool you require is a pair of sharp scissors or a cutter, which will ensure clean cuts along the strips’ designated cut points. Without this precision, there’s a risk of damaging the light strip.
A measuring tape is also indispensable in this process. Before you ask, ‘Can strip lights be cut to length?’, know that correct measurement is key; it is important to calculate the exact length required for your landscape strip lights project before making any cuts.
In some cases, especially in scenarios where you plan on reconnecting strips after cutting, connectors are also crucial elements. There are various types, such as solderless connectors or snap connectors, which provide an uncomplicated means of joining LED strips without any mess.
Another important material is adhesive tape or clips for securing the LED strips post-installation. It’s not enough simply knowing how to cut LED strip lights; understanding how they’ll be secured firmly in place post-cutting is just as integral.
A test power supply can prove invaluable. Testing each segment after it has been cut ensures their functionality hasn’t been compromised during modification.
Safety Measures to Consider
Ensuring Safety while Handling Cut Strip Lights
Can strip lights be cut safely? Absolutely – provided appropriate safety measures are taken. First, it’s paramount to ensure the strip lights are unplugged before starting any modifications. Working on live electrical equipment is fraught with risks of electric shock.
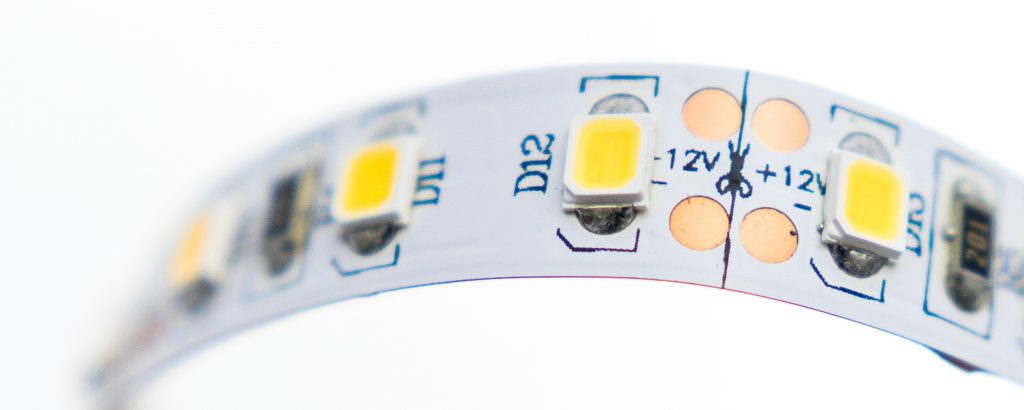
Secondly, always cut along the designated lines or copper dots on LED strips. These marks indicate safe areas where the circuitry won’t be disrupted by cutting. Failing to adhere to this guideline can lead to circuit damage and malfunctioning lights.
Handling of tools should also be done with utmost care, especially when using sharp instruments like scissors or cutters. A simple slip could lead not only to damaging your LED strip but also to personal injury. When reconnecting strips or working with connectors, ensure your workspace is dry to prevent electrical faults or shocks.
Choosing the Right Length for Your Project
Optimal Length Selection: A Crucial Determinant of Your Project’s Success
Can LED strip lights be cut to suit any project length? Most certainly! But plan carefully – knowing precisely how much length you need for your project is essential before making any cuts. Measure the area where you intend on installing the landscape lighting accurately and account for corners and contours that may require extra length.
Preparing before cutting strip lights is a critical step often glossed over in a rush to see those beautiful LEDs light up. But remember – thorough preparation will save time later troubleshooting issues like how to fix LED strip lights when cut improperly.
Modifying LED strip lights does involve some technical work in terms of cutting and reconnecting sections if needed; hence, keeping modifications minimal reduces potential complications. An important point often overlooked involves considering power requirements – longer runs of LEDs require more power, which might necessitate additional or larger capacity power supplies.
Cutting Process: A Confluence of Precision and Accuracy
The cutting process of strip lights is a combination of precision and accuracy, demanding subtle meticulousness. One must approach this task with equanimity to prevent unforeseen mishaps or inaccuracies. It’s worth noting that LED strip lights can indeed be cut, providing the flexibility to adapt these lighting accessories to fit any spatial requirement.
In landscape strip lighting applications where unique shapes and contours need illumination, the ability to cut strip lights becomes particularly useful. Equipped with the right tools – a sharp pair of scissors or a utility knife – you are ready to embark on this intriguing journey of customization.
It is paramount to remember that each cut should be as clean and straight as possible, ensuring optimal connection points for future use. The cutting process itself is relatively straightforward but requires keen attention to detail. Moreover, consider marking out your measurements before making any cuts in order not only for accuracy but also for ease during the installation process.
An important factor often overlooked until too late is checking the working condition of your LED strip lights before cutting them. After all, it would be futile laboring over a non-functional piece. So it’s always recommended to first test them in their entire length before proceeding with any modifications. How one handles these cut pieces after customizing them also contributes significantly towards their longevity and overall performance – more about which we shall discuss in subsequent sections.
Deciphering Your Cutting Map: The Art of Identifying Cut Marks
Strip lights come equipped with pre-marked points designated for safe cutting – commonly known as ‘cut marks‘. These cut marks often appear as dotted lines across the strips or sometimes even highlighted by copper dots depending on the manufacturer. Identifying these cut marks correctly holds paramount importance when customizing your LED strips’ length since they determine where precisely you can safely sever your light strips without causing irreversible damage.
If you’ve ever wondered, ‘What happens when we cut LED strip lights?’, cutting at any random place could result in the malfunctioning of the segments or, worse, the entire strip. Therefore, it’s crucial to always look out for these cut marks as your trusted guide when navigating through this process. They will ensure that you can safely shorten your LED strips without worrying about potential damage or malfunctions.
The Fine Art of Cutting: The Masterstroke
Now we delve into the main event – how to properly cut along these marks. Clarity is key here; remember, these are not suggestions but explicit indicators of where you should make your incisions on your LED strip light.
When cutting, make sure your scissors or utility knife align perfectly with these marks and apply a firm yet controlled pressure. This will help create a neat, clean cut, which is vital when looking to reconnect these pieces later on.
Remember to keep a steady hand and be deliberate with each cut, ensuring precision and accuracy every time ‘Can strip lights be cut?’ crosses your mind. This level of detail might seem excessive initially, but trust in its value when you’re rewarded with a perfectly fitting landscape lighting setup.
Striving for Perfection: Pro Tips for Precise Cutting
We’ve all heard the adage ‘measure twice, cut once’, and nowhere does it hold truer than in our current pursuit of cutting strip lights precisely. Start by measuring out where exactly you need your light strips on the intended area – this could be under kitchen cabinets, around television sets, or illuminating landscapes – and mark out those measurements on the light strips using a marker pen before advancing towards cutting them.
One pro tip often overlooked is considering some extra length during this measurement stage. A few extra centimeters can offer valuable flexibility during installations without affecting overall aesthetics given their discreet nature.
Another point worth remembering is that it’s always better to err on the side of caution when deciding on where to cut – can strip lights be cut to length? Yes, they can, but it’s often easier to remove more later if necessary than to try to fix a light strip that’s been cut too short.
Always ensure your cutting tool is in good condition. A dull blade can result in uneven cuts or even damage the circuitry within the strip lights. Regularly check and replace your cutting tools for optimum performance.
Reconnecting Cut Pieces: Breathing New Life into Your Strip Lights
Upon cutting your strip lights to the desired length, a vital step is reconnecting these pieces. This procedure resonates particularly with frequently asked questions such as ‘How to fix LED strip lights when cut?’ and ‘Can LED strip lights be cut and reconnected?’. The answer is, unequivocally, yes.
With the right tools and techniques, you can seamlessly reconnect your cut pieces and have them functioning as impressively as they did before. Whether you’re installing landscape strip lights or spicing up your indoor space with these useful illuminants, knowing how to properly reconnect cut pieces can spare you unnecessary expenses of buying new ones or hiring a professional.
This skill empowers any DIY enthusiast or professional electrician to make the most of every inch of their strip light reel without compromising functionality. Moreover, cutting does not degrade the quality of strip lights.
To further dispel any doubts about ‘What happens when we cut LED strip lights?’, it’s important to note that cutting only affects the length and not their ability to emit light. As long as they are correctly reconnected following a precise cut at the proper markings, your strips should continue serving their purpose admirably.
It’s worth noting that anyone can learn how to handle this task proficiently. So whether you’ve been wondering, ‘Can strip lights be cut?’ or ‘Can LED strips be modified to fit my space?’, take solace in knowing that it’s entirely possible and manageable with just a little know-how.
A clear understanding of what happens after we sever our LEDs can give us confidence in undertaking this task while also preventing unnecessary worry over potential damage or waste. With patience, practice, and adherence to guidelines provided hereafter, one can acquire mastery over this crucial aspect of handling LED strips.
Types of Connectors: Choose the Most Suitable Companion
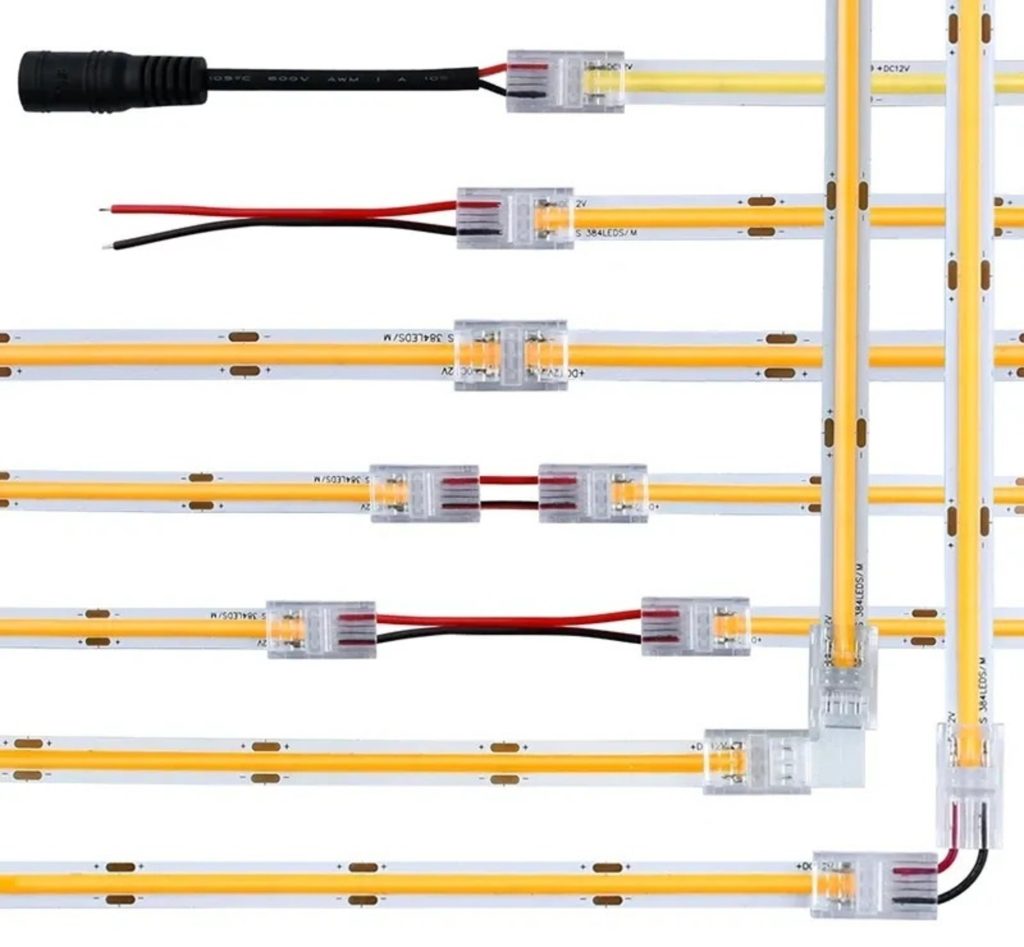
Before plunging into the reconnecting process, one must understand the different types of connectors available – each designed to make your task easier and the outcome more successful. A popular choice among many users is solderless connectors – a type lauded for its simplicity and ease of application.
Solderless connectors come in various forms, with options including strip-to-strip connectors (ideal for linking two pieces of strip light) and strip-to-power connectors (designed to connect your strip lights directly to a power source).

Their primary advantage lies in their straightforward application, negating the need for any soldering. Besides solderless options, there are also snap or clip-on connectors – these are particularly useful when you wish to link cut pieces at an angle. They offer an easy way around corners without bending or damaging your LED strips. Moreover, they can often be used with waterproof strips as well, making them quite versatile.
Despite the convenience offered by these varieties, it’s crucial to choose a connector compatible with your particular type of LED strip light. Factors such as size (8mm or 10mm), pin number (usually between 2-5), and whether your LED strips are waterproof should guide you towards finding a suitable connector.
In essence, understanding different connectors equips one with the necessary knowledge required before venturing into ‘how to reconnect cut LED strips’. This information aids in making informed decisions that ultimately lead towards attaining desired lighting outcomes, whether for landscape lighting or other spaces.
Step-by-Step Guide: Easy Steps towards Seamless Reconnection
This section explicates a step-by-step guide on how to reconnect using these handy accessories once you’ve managed to properly cut your LED strips. This tutorial can help answer queries like ‘How to cut LED strip lights and reconnect them?’
First, ensure your strip light is disconnected from any power source. This is a crucial safety step that should never be overlooked. After this, open your connector – for a solderless connector, this typically involves lifting up the panel to expose the interior.
Next, insert the cut end of your LED strip into the connector, making sure that the copper pads align with the connector prongs. Once properly inserted, close the connector firmly to establish a secure connection. Repeat this process for all other cut pieces you wish to reconnect or if you’re connecting it back to a power source.
Once you have successfully completed these steps, simply connect your LED strips back to power and watch them light up once again. It’s also essential at this stage to do a functionality test on your reconnected pieces before full installation. This will allow you to rectify any connection issues promptly and save installation time later on.
Alternative Methods: Soldering the Way Through
While connectors offer convenience in reconnecting cut LED strips, some prefer going about it via an alternative method – soldering. This method provides a more robust connection and works well for those unable or unwilling to procure specialized connectors. It does require more tools and skill but can certainly provide great results when done correctly.
Soldering starts by stripping back about 5mm of silicone (if present) from each end of your cut LED strips using a craft knife or similar tool. Following which you’ll need some thin wires that are then pre-soldered by applying some solder on them so they can easily stick onto the copper pads on each side of LEDs.
The next step would be positioning these pre-soldered wires over their corresponding copper pads before applying heat using a soldering iron. Remember to do this carefully, ensuring that the right color wire aligns with its matching pad (red to red, green to green, etc. for RGB strips). After successfully doing this for each wire on both sides of your cut strip, you would have effectively created a bridge between the two parts of your LED strip light.
Soldering as an alternative method may seem like a more complex process compared to using ready-made connectors. However, it provides a seamlessly strong connection, which can be of great advantage, especially in outdoor or heavy-duty applications such as landscape strip lights.
Installing and Testing of Cut Strip Lights
A Comprehensive Guide on the Proper Installation Process
The crucial question, ‘Can strip lights be cut to length?’ is often followed by another pertinent query: ‘How do I properly install my freshly cut strip lights?’ The installation process of your newly cut strip lights is a critical phase in ensuring optimal functionality and achieving the desired lighting ambience for your space.
The first step in this process involves preparing the location where you intend to install your landscape strip lights. Ensure the area is clean and devoid of any obstructions that might interfere with your installation process. This might involve wiping down surfaces or moving furniture, as needed.
Next, you will need to measure out the exact length of the area you want to illuminate with your cut strips. Remember, precision is key here; therefore, it’s better to measure twice than to end up with a strip that’s too short or unnecessarily long.
After all, the beauty of LED strip lights lies in their customizable nature; they can indeed be cut to fit perfectly into any landscape lighting arrangement. Once you have measured out the length correctly, proceed with attaching your cut LED light strips.
You can use either adhesive tape if it came pre-attached at the back of your LED strips or opt for clip-on mounts for a more secure attachment. Ensure that they are positioned accurately before firmly pressing them onto the surface at regular intervals.
Connect your LED strips back to their power source using either a compatible connector or by soldering them directly onto it. Make sure all connections are done correctly and securely before moving on to testing their functionality.
Ensuring Top-Notch Performance: Testing for Functionality
After successfully installing your landscape lighting setup comes an equally important aspect – testing for functionality. Many wonder, ‘What happens when we cut LED strip lights?’ Fear not; when executed properly, cutting and reinstalling LED strip lights should not impede their performance.
Start by turning on the power to your LED strip lights. Observe if the whole length of the strip is lighted uniformly. If you notice any inconsistencies or dead spots along your strips, it’s likely an indication of a faulty connection or a poorly cut section.
For issues related to connections, inspect all junctions carefully for loose wires or ill-fitted connectors. Ensure all electrical contacts are tightly secured, and reinstall any connectors if necessary. In situations where some sections of the strip aren’t lighting up despite optimal connections, it could be that the strip was damaged during the cutting process.

This brings us back to another question: ‘How to fix LED strip lights when cut?’ The answer lies in checking your cut marks again, as improper cuts can cause damage leading to malfunctioning areas on your strips. In severe cases where a section refuses to light up despite numerous checks and fixes, you might need to consider replacing that particular segment of LED strip light.
Remember that precaution is always better than cure; hence, ensure you conduct periodic checks on the functionality of your landscape strip lights even post-installation, ensuring longevity and sustained performance. The ability to customize lighting in accordance with personal preferences is one feature that makes LED strips incredibly popular.
The answer to whether ‘Can LED strip lights be cut?’ is a resounding yes! And with proper installation and regular functional checks, they promise brilliant luminance tailored just for you.
Common Mistakes to Avoid When Cutting Strip Lights
Avoiding the Pitfalls: Ensuring Precision When Cutting Strip Lights
When it comes to strip lights, particularly the LED variety, one may naturally wonder, ‘Can LED strip lights be cut?’. The answer is yes, they certainly can. Yet a degree of precision and understanding is required to perform this task correctly. Missteps can lead to damage or suboptimal functioning of your lights.
Cutting in the Wrong Places
One of the most common mistakes people make when working with strip lights, be they landscape strip lights or any other kind, is cutting at the wrong places. This error typically stems from a lack of understanding about where these cutting points are located.
Strip lights are designed with specific sections, usually marked by lines or dots along the light tape. These are designated as safe places to trim your light strips without causing damage. What happens when we cut LED strip lights outside these marked areas? The circuitry gets disrupted, leading to non-functioning segments or irregular light output. It’s essential to pay close attention and cut only along these specified marks for optimum performance.
Not Measuring Correctly: A Key Mistake in Modifying Your Strip Lights
Another serious mistake often made pertains to incorrect measurements. This blunder can have several detrimental effects on the outcome of your lighting project. When excited about installing new lighting fixtures like landscape lighting using LED strips or preparing indoor ambient lighting, you might get tempted into hurrying the process and overlook the importance of precise measurement before cutting your light strips.
To avoid this mishap, always take time before beginning your project; measure out exactly how much length you require for each specific area you plan on installing these strip lights. Remember that overestimating or underestimating by even a few inches could render your entire project ineffective – leaving dark spots in an otherwise well-lit space or overhanging strips that can be an eyesore.
Can strip lights be cut to length? Yes, they can. And this is why exact measurements are so crucial. This knowledge allows you to maximize the potential of your strip lights effectively and makes the installation process seamless and efficient.
How to Fix LED Strip Lights When Cut: Overcoming Obstacles
Despite careful planning, mistakes may still occur. Even when you’ve meticulously measured, marked, and made your cuts, you may find yourself wondering how to fix LED strip lights when cut wrongly. The good news is, even if a mistake does occur, it’s not always a lost cause. There are several ways you can salvage your project using connectors and extensions to correct cutting errors.
However, it’s crucial to remember that prevention is better than cure: taking careful note of the common mistakes outlined in this section will help you avoid pitfalls in the first place. By being mindful while cutting strip lights, whether for landscape lighting or indoor use, we can ensure a successful outcome for our lighting projects.
Advanced Tips and Tricks for Cutting & Using Cut Strips
Razor Sharp Precision: Mastering the Art of Strip Light Cutting
Cutting strip lights can seem daunting, but with some advanced tips and tricks, you can acquire razor-sharp precision that effortlessly answers the question, ‘Can strip lights be cut?’. The precision tools make the answer a resounding yes.
Firstly, secure your strip lights before cutting. An unsecured light may move around and lead to inaccurate cuts. Use small clamps or adhesive tape to secure them on a flat surface.
Secondly, consider investing in specialized cutting tools designed for LED strips. These tools offer superior control and accuracy compared to general-purpose scissors or knives.
A decent magnifying glass could also come in handy if your vision is not sterling. It helps in identifying the copper dots on which to apply pressure when cutting. Use a steady hand while cutting along these marks to avoid damaging adjacent LEDs.
Always remember that haste makes waste; take your time when cutting LED strip lights. Mastering this process requires patience and practice, as rushing might result in uneven cuts or damaged LEDs.
Achieving Desired Lighting Effects with Cut Strips
Light Up Your World: Maximizing Aesthetic Impact with Strip Lights
In addition to understanding ‘What happens when we cut LED strip lights?’, it’s worthwhile knowing how to manipulate these cuts for desired lighting effects, especially for landscape lighting. One innovative approach is setting up different lengths of strips in various locations throughout an area; this creates contrast and highlights specific elements within a room or outdoor space like landscape strip lights.

You can go creative by using color-changing LED strips, which allow you to customize lighting based on your mood or the required ambiance. Use a remote or smartphone app to change colors, dimming levels, and even set up automated lighting schedules.
Another tip is to experiment with layering lights. Layered lighting involves combining strip lights with other types of lights (like spotlights) to create a more nuanced lighting effect.
Consider integrating your cut strip lights with smart home systems for a completely seamless and customizable lighting experience. This allows you to control your landscape strip lights right from your phone or through voice commands.
Maintenance Tips for Longer Life
Let There Be Light: Ensuring the Longevity of Your Strip Lights
After successfully addressing concerns about ‘Can strip lights be cut?’, it’s crucial to keep them in top shape for longevity. Regularly dusting off your LED strips prevents buildup that might block light output and result in overheating, which can shorten their lifespan.
If installed outdoors like landscape strip lights, make sure they’re well-protected against weather elements such as rain or direct sunlight by using waterproof LED strips or installing them under eaves or decks where they’re somewhat sheltered.
Do not exceed the rated voltage of the LED strips; too high-voltage will cause them to overheat, leading to damage, while too low-voltage will result in dimmed light output. If you notice any flickering or inconsistent brightness issues after cutting and reinstalling, troubleshoot by checking all connections are secure, and if necessary, replace faulty sections instead of trying to fix LED strip lights when cut.
Conclusion: How To Cut Strip Lights?
Cutting and utilizing LED strip lights effectively is an art that requires skill as well as creativity. With these tips and tricks under your belt, not only can you confidently answer ‘Can strip lights be cut?’, but also create mesmerizing effects in your spaces with precision-cut strip lights.
Remember that maintenance is key to ensuring the longevity of your LED strip lights, keeping them shining brightly for years to come. Embrace this lighting revolution and experience a world lit by the versatility and beauty of cut strip lights.
You may also be interested in the following posts: