An Introduction to Effectively Connecting Light Strips
Unfolding the Enigma of Strip Lights
Strip lights have quickly ascended to prominence in modern lighting design, offering a dynamic blend of versatility, efficiency, and visual impact. Whether they grace your living room or illuminate your garden as landscape lighting, these slender luminous wonders serve as an elegant solution to a plethora of lighting needs.
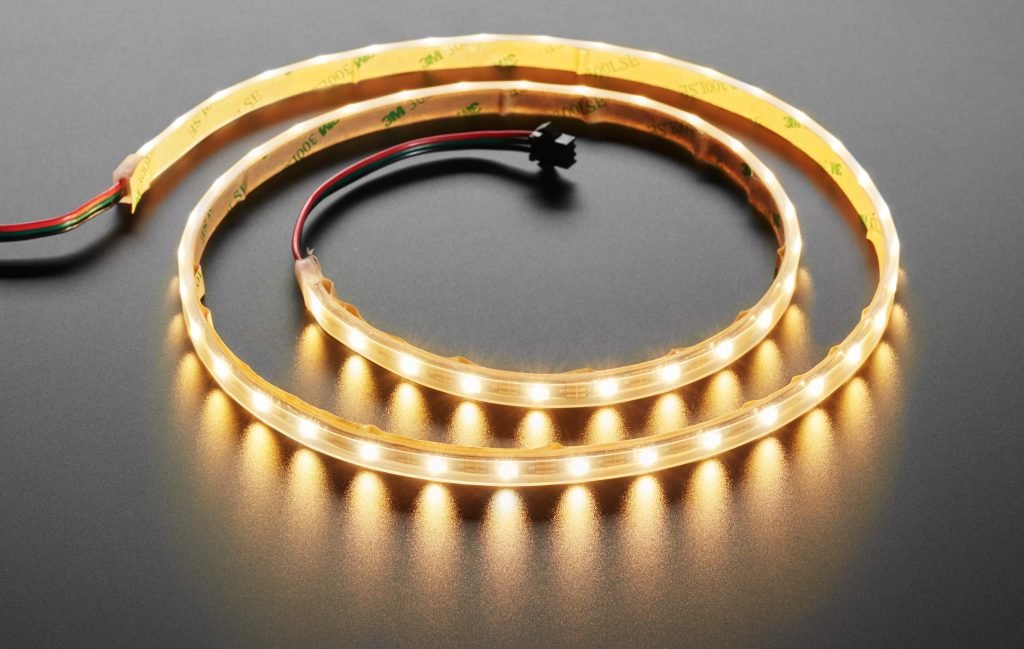
At their most basic, strip lights consist of a flexible circuit board populated by a series of light-emitting diodes. These are typically arranged in linear arrays and encapsulated in clear or diffused plastic for protection and light dispersion. There’s more than meets the eye when it comes to strip lights.
They can be cut at designated intervals along their length and reconnected using specialized connectors or soldering, which makes them highly customizable for different sizes and shapes. So whether you wonder how many LED strip lights can be connected or how to connect LED strip lights when cut, the possibilities are virtually endless.
The Brightening Impact: Significance and Advantages of Strip Lights
The rise in popularity of strip lights is not without reason; their unique characteristics offer several advantages over traditional forms of lighting. Arguably one among these is convenience – how often do we seek answers to queries like ‘Can we connect LED strip lights?’ or ‘How do we connect LED strips directly to power?’ The simple answer lies within the inherent design philosophy behind these luminous marvels – they’re designed with user-friendly installation procedures that allow even novices an easy ride through the installation process.
Moreover, their slim profile allows them to be discreetly installed in places where conventional lighting solutions would be too bulky or obtrusive – under cabinets, along stairways, around mirrors, and artwork – not forgetting outdoors as striking landscape strip lights. Furthermore, their energy efficiency is unrivaled – LEDs consume less electricity than incandescent bulbs but deliver equivalent if not superior luminosity, making them a sustainable choice in today’s eco-conscious world.
Navigating the Luminary Landscape: The Extent of This Guide
This guide aims to demystify the process of connecting strip lights, answering questions that might arise when embarking on such a project. ‘Can we connect an LED strip from either end?’, ‘How to connect strip lights together?’ These and more will be answered as we delve into the practicalities of setting up your strip lights.
Whether you’re a hobbyist looking to brighten up your workspace or an interior designer seeking new ways to enhance a space’s ambient aesthetics, this guide provides detailed instructions and expert insights into connecting strip lights from planning through installation and troubleshooting. The road ahead is lit with potential as we explore the intricacies behind making these enchanting light sources come alive. Let’s embark on this revelatory journey together!
Unraveling the Mystery of Strip Lights
Strip lights, also known as LED tape or ribbon lights, are flexible circuits carrying an array of small light-emitting diodes. Revolutionizing the world of lighting with their versatility, strip lights have found their way into various applications ranging from accent lighting in homes to landscape lighting in gardens. There exist three prominent types of strip lights: LED strip lights, RGB strip lights, and Neon Flex strip lights.
LED Strip Lights: Efficiency and Diversity
LED strip lights have become a popular choice for both residential and commercial applications. They exist as a continuous line of LEDs mounted on a flexible strip that can be cut into desired lengths. Many people often wonder, ‘How to connect LED strip lights?’ The process is straightforward; these strips can be connected either by soldering them directly to power or using connectors specially designed for LEDs.
While thinking about landscape strip lights, a question may arise: “Can we connect LED strip lights?” Indeed! You can connect multiple strips together as per your needs. However, it’s important to note that the number of strips you can connect depends on your power supply’s capacity; hence, always consult an expert before doing so.
RGB Strip Lights: A Symphony of Colors
RGB (red-green-blue) strip lights are akin to traditional LED strips but with an added feature – they change colors! Each tiny bulb on the RGB strip is essentially an integrated light composed of red, blue, and green diodes. By varying the intensity level among these diodes, they produce different shades dynamically.
Connecting RGB strips may appear tricky due to their color-changing attributes, but fret not! The question ‘How do we connect LED strips directly to power?’ has a simple answer: like regular LEDs, you can solder them directly or use compatible connectors.
Neon Flex Strip Lights: The Retro Revival
Neon Flex strip lights, as the name suggests, are designed to mimic classic neon lighting while offering the benefits of power efficiency and longevity provided by LED technology. They provide a consistent light that diffuses evenly across the surface, mimicking the vintage neon signs’ glow.
Connecting neon flex strips is similar to their LED counterparts with some minor differences in hardware components. It’s essential to ensure these lights connect correctly for optimal performance.
Decoding Components of Strip Lights
The beauty of strip lights lies in their simplicity. Their primary components include light-emitting diodes, resistors, and adhesive backing.
Light-Emitting Diodes (LEDs): Tiny Titans
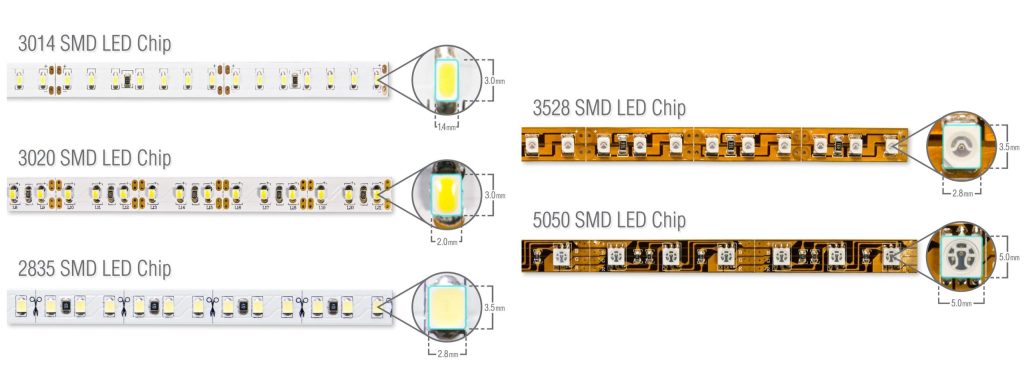
LEDs are the basic elements of any light strip. Each diode is a semiconductor device that emits light when an electric current passes through it. They have revolutionized lighting due to their energy efficiency and durability, outperforming traditional lighting solutions in almost every aspect.
If you’ve ever thought about ‘How many LED strip lights can be connected?’ or ‘Can we connect an LED strip from either end?’, you must understand LEDs’ functionality first. These tiny titans are designed to provide optimal performance at specified voltage levels; hence, understanding your strip’s voltage requirement is crucial before connecting them.
Resistors: The Unsung Heroes
Resistors may not be as glamorous as LEDs on a strip light but play an equally important role by regulating current flow through each diode, ensuring it operates within safe parameters. A resistor ensures that the LEDs don’t draw more current than they’re designed for, thus protecting them from early burnout. When pondering over ‘How to connect strip lights together?’ always consider resistors’ role in maintaining your setup’s health and safety.
The Magic behind Adhesive Backing
Adhesive backing is the unsung hero that makes installing strip lights a breeze. This sticky layer on the strip’s backside allows easy mounting on various surfaces. Whether you’re installing landscape strip lights or adding accent lighting in your kitchen, the adhesive backing eases the process significantly.
However, it’s essential to prepare your surface adequately before applying the strips, as dust and moisture can impede adherence. Also, remember that while connecting multiple strips together, ensure their adhesive sides align correctly to maintain seamless installation.
Tools and Materials Needed for Installation
Essential Apparatus: The Backbone of Strip Light Installation
Every successful task requires the right tools, and when it comes to strip light installation, this rule is no exception. Foremost among these essential tools are wire cutters. These provide precision in cutting the LED strip lights to the exact length required for your project.
A clean cut ensures a smooth connection, especially crucial when you’re pondering over ‘How many LED strip lights can be connected?’ or ‘Can we connect an LED strip from either end?’. Second on your tool list should be connectors.
Connectors are pivotal components that allow you to join multiple strips together seamlessly, answering the often asked question, ‘How to connect strip lights together?’. They also facilitate the reconnection of pieces that have been separated by cutting.
Another requisite tool is a soldering iron for those opting for a more permanent connection solution. This tool helps create robust junctions between strips and power supplies, answering another question: ‘How do we connect LED strips directly to power?’
Soldering may seem complex, but with careful execution and safety measures, it becomes an invaluable method. A set of screwdrivers will also come in handy during installation, particularly when affixing power adapters or controllers in place or securing mounting brackets.
There’s no such thing as being overprepared when installing landscape lighting; every piece of equipment has its purpose. Last but not least, don’t forget your multimeter – a tool used to confirm electrical continuity across your connections – ensuring all lights will function as expected once powered on.
Material Considerations: The Lifeline of Your Lighting Project
Equally important as tools are the materials required for connecting strip lights – these form the backbone of any successful lighting project. Paramount among these materials is a suitable power supply or adapter capable of meeting the voltage requirements of your strip lights. Without a reliable power source, even well-connected lights remain dormant.
The controller is another critical component, particularly for those installing RGB or other color-changing strip lights. These versatile devices unlock access to a broad palette of colors and dynamic light effects, adding vivacity to your lighting installation.
Wiring becomes especially relevant when addressing ‘How to connect LED strip lights when cut?’ Wires create a pathway for electricity to flow between the various components within your system. Choosing the right gauge wire is essential, as it must be capable of carrying the current demands of your LED strips without overheating or causing voltage drop.
Adhesive tape is another indispensable material – there’s nothing more frustrating than successfully connecting your strips only for them to come unstuck minutes later. Select an adhesive with good bonding strength appropriate for the surface on which you intend to mount your strip lights.
Do remember that if you want to connect LED strip lights together, connectors of different shapes such as ‘L’, ‘T’ and ‘+’ are necessary depending upon the layout you plan for installing the landscape strip lights.
Beyond the Basics: Optional Accessories that Elevate your Lighting Project
While not strictly necessary, certain accessories can elevate a basic lighting project into something truly spectacular. Consider diffusers; these handy devices soften and distribute light evenly across surfaces – reducing harsh shadows and creating a more professional finish.
For those embarking on large-scale projects such as landscape lighting or garden illumination, mounting brackets become an optional but very valuable accessory. These fixtures provide enhanced stability and precision positioning to showcase your landscape in its best light.
Extension cables are yet another accessory that comes into play when discussing ‘How to connect LED Strip Lights?’ Depending upon where you need to position the power supply in relation to your strip lights, extension cables could be key in ensuring you can span any distance with ease.
Although not mandatory, a signal amplifier could be beneficial for larger installations. When pondering ‘How many LED strip lights can be connected?’, it’s important to remember that after a certain length or number of LED strips, the signal from your controller may weaken – leading to inconsistent lighting effects. A signal amplifier boosts the control signal, ensuring uniform illumination across all strips.
Investing in the right tools and materials streamlines your LED strip light installation process. From wire cutters to power supplies, each component plays a pivotal role in creating an effective and visually stunning lighting display. Whether you’re lighting a small room or transforming an expansive landscape, having the right tools and materials at hand is the first step towards achieving your vision.
Preparation Before Installation
Selecting the Right Type of Strip Light for Your Project: Navigating the Spectrum of Choice
Understanding what type of strip light best fits your specific project is paramount. First, ask yourself, ‘Can we connect LED strip lights?’ If the answer is affirmative, then you are ready to delve deeper.
LED strip lights come in a variety of types, each with their unique characteristics and advantages. There are basic monochrome types ideal for simple tasks like accent lighting or more sophisticated RGB strips that can change colors according to mood or event.
For outdoor applications such as landscape lighting, weatherproof LED strips might be the best option due to their resilience against the elements. Your decision should hinge on several factors, including brightness requirements, color preferences, and where you intend to install them.
For instance, if your intent is landscape strip lights, then weather-resistant LEDs would be an optimal choice. Ultimately, your choice will profoundly influence how successful your project turns out.
Accurate Space Measurement: The Blueprint for Success
Knowing how much space you need to cover with your strip lights plays a crucial role in achieving an aesthetically pleasing result. This process involves taking meticulous measurements of the area where you plan to install the lights – whether it’s under kitchen cabinets or around a garden path for landscape lighting.
When determining ‘How many LED strip lights can be connected?’, consider that longer runs may require additional power sources to maintain consistent brightness across all LEDs. Additionally, most LED strips can be cut at designated intervals (usually every 2-4 inches), allowing for custom lengths that fit perfectly into your planned setup.
Power Supply Location Planning: The Source of Your Lighting System
Once you have decided on the type and length of your LED strip light and taken accurate measurements of your installation area, it’s time to consider, ‘How do we connect LED strips directly to power?’ Answering this question requires identifying suitable power source locations. Whether your project is indoor accent lighting or outdoor landscape strip lights, your power source should be conveniently located and, where necessary, weatherproof.
For example, when considering ‘How to connect strip lights together?’, remember that each connection point will need proximity to a power source. Also essential is the capability of the chosen power supply unit to handle the load of your LED strips.
You might find yourself asking, ‘Can we connect an LED strip from either end?’ In such cases, it’s worth noting that while connecting from both ends can help maintain brightness in longer runs, it also necessitates careful planning of your power sources’ locations. From selection through measurement and finally to powering considerations, proper preparation is indeed half the task done right in any successful strip light installation project.
Common Techniques for Properly Connecting Light Strips
Cutting the Strips to Length: Precision is Key
Knowing how to properly measure and cut your strip lights is a crucial part of the installation process. The premise of cutting LED strip lights lies in identifying the ‘cut lines’ that are typically indicated by a line through four solder points.
Amidst the landscape strip lights, you’ll notice marked areas designated for cutting. A common query that arises is, ‘How many LED strip lights can be connected?’ This largely depends on your chosen power source’s capacity and the size of your project.
Always make sure to measure twice and cut once; this adage holds particularly true when cutting expensive LED strips. When it comes to landscape lighting, first measure along the desired path where you plan to install the strips, taking into account any winding or curvature of your layout, which may require additional length.
Then mark where you need to cut on your LED strip light. Remember – never cut outside of these designated areas, as doing so could damage circuitry and hinder the proper functioning of your LEDs.
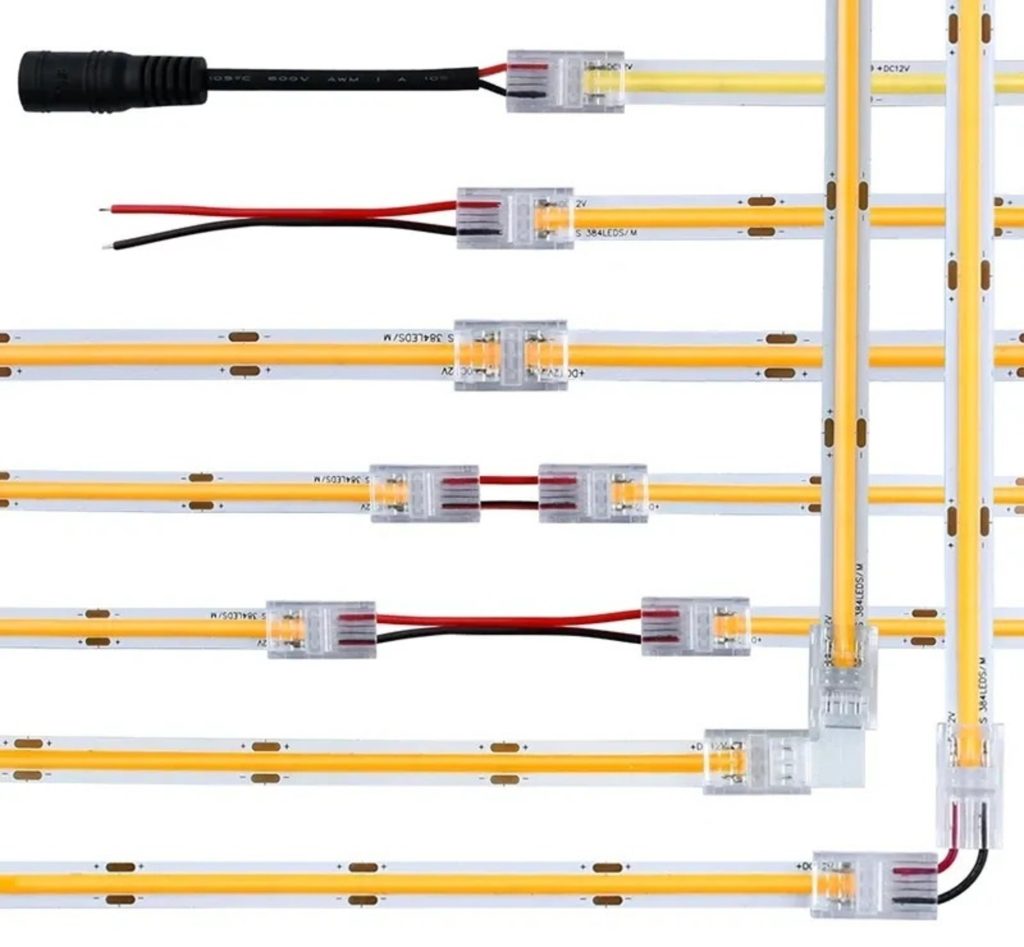
Attaching Connectors: The Art of Joining
Once you’ve accurately cut your LED strip lights, it’s time to attach connectors on each end. Strip connectors often come in varied forms depending on whether they are meant for single color or RGB strips.

Start by peeling back about a quarter inch of tape from each end of both strips, revealing bare sections ready for attachment. Then slide one connector onto one end until all four contact points align with the copper pads on the flexible printed circuit board (PCB) underneath.
One might wonder, ‘Can we connect an LED strip from either end?’ Yes, provided that polarity is maintained consistently throughout. Most connectors have arrows indicating directionality – it’s crucial these point towards the ‘+’ sign indicating direction toward diodes.
Creating Unity: Connecting Strip Lights Together
Now that we’ve understood ‘How to connect LED strip lights when cut?’, let’s explore connecting multiple strips together. This is especially useful for larger projects where one strip might not suffice.
Plug one end of your connector into the first strip and the other end into the next strip, ensuring a snug fit on both ends. Repeat this process with as many LED strips as needed, keeping in mind power source capacity limitations.
Always remember to maintain consistency in terms of color arrangement or sequence, especially with RGB strips. Misalignment could potentially result in color inconsistencies along the strips.
Powering Up: Connecting Strips to a Power Source
Knowing ‘How do we connect LED strips directly to power?’ is the next step. The simplest way is to use a power cord with a built-in rectifier, which converts AC from wall outlets into DC suitable for LEDs.
LEDs have polarity, and hence it’s important that positive and negative terminals from your LED are correctly connected to corresponding terminals on your power source. Interchanging these can result in a lack of lighting or worse – damage your LEDs.
The Direct Approach: Connection to a Wall Outlet
The most common method for home installations involves direct connection to a wall outlet. After you’ve securely connected all your strips together, simply attach them directly to an appropriately rated 12V or 24V DC adapter plug (depending upon your strip’s voltage requirement), and then plug this adapter directly into any standard wall outlet.
Optimal Control: Connection through an LED Driver or Transformer
For more control over brightness levels and color modes (in case of RGB LEDs), you might consider using an LED driver or transformer between the wall outlet and your light strip. These devices offer dimming capabilities, programmability, and other advanced features not available through direct-to-wall connection methods. To achieve this connection, simply connect one end of your driver or transformer to your LED strip and the other end to your power source, keeping in mind correct polarity matching.
Portable Power: Connection via Battery Pack
For portable or temporary installations, a battery pack or portable power source can be used. Battery-powered LED light strips are perfect for outdoor events or projects where wall outlets might not be readily accessible. Remember to choose a battery pack with an output voltage that matches your LED strip requirements.

Just like previous methods, ensure that the positive and negative terminals on both the battery pack and LED strips are correctly matched before making connections. This detailed exploration should have provided enriched insight into ‘Can we connect LED strip lights?’ Indeed, we can – with some careful measurements, steady cutting hands, the right connectors, and knowing how to optimally utilize our power sources.
Troubleshooting Common Issues with Connecting Strip Lights
Illuminate the Darkness: Diagnosing Issues with Nonworking or Flickering Lights
The labyrinth of lighting issues can be bewildering, especially when dealing with advanced tech such as strip lights. When we ask ourselves, ‘Can we connect LED strip lights?’ and they do not function as expected, it is natural to feel frustrated. However, a systematic approach often eases the process.
The most common issue faced during strip light setup is non-working or flickering lights. This problem can stem from a myriad of sources, including faulty power supply, low-quality LEDs, or poor wiring connections. To diagnose this issue effectively, it’s important to first ensure that your power supply unit (PSU) is functioning correctly. Test the PSU with another LED strip if available. If an alternate LED strip works perfectly well with the same PSU, the problem lies within your initial LED strip.
Oftentimes, you may notice that only a section of your landscape strip lights is flickering or not working at all. This usually indicates a localized issue and might be due to faulty LEDs in that particular section. To confirm this hypothesis, simply cut out the faulty section and retest the remaining part of the strip light.
Another possibility for non-working or flickering landscape lighting could be due to poor quality control during manufacturing, which may lead to a few dead LEDs on arrival, in which case replacement is typically necessary. Remember that checking connections between strips – even when you know how to connect LED strip lights together – can solve many issues; loose or improper connections may cause intermittent function leading to flickering effects.
Wired but Tired: Fixing Problems with Connections or Wiring
While learning how to connect LED strip lights directly to power might appear straightforward on paper – cut strips at appropriate lengths and attach connectors – in practice, it can be rife with challenges. Loose connections are a common culprit for malfunctioning strip lights.
You might have asked, ‘Can we connect an LED strip from either end?’ While the answer is yes, ensuring a secure connection on either end is crucial for stable performance. Sometimes the issue might lie in your ability to connect multiple LED strips.
If you’ve been wondering, ‘How many LED strip lights can be connected?’, the answer lies in your power source’s capacity and the length of your LED strips. Always ensure that your power source can handle the total number of LEDs you intend to light up.
In cases where strip lights fail to light up after being cut, one must return to basics – understanding ‘How to connect LED strip lights when cut?’ This requires careful attention while cutting along designated lines and using proper connectors that match the size and type of your strips. Always double-check wires between the controller and strips or power supply; they may get loose or mismatched, causing erratic behavior.
Addressing Issues with Adhesive Backing Not Sticking Properly
Now you know how to connect LED strip lights directly to power and troubleshoot many common issues. However, once they beautifully illuminate your space, adhering them securely becomes paramount.
One recurring problem with landscape lighting installation is dealing with faulty adhesive backing on LED strips that refuses to stick properly. This could result from several factors, including surface preparation (or lack thereof), exposure to excessive heat or cold during application, or simply substandard adhesive on the product.
To rectify this issue, begin by ensuring that the surface where you plan on affixing these landscape strip lights is clean – free from dust particles or oil – it makes a significant difference in adherence longevity. Consider using additional adhesives such as double-sided tapes or silicone adhesive for better sticking results, especially if you’ve faced repeated issues in this area.
Also, remember to check the temperature range in which the adhesive works best – applying it within this range can greatly enhance its effectiveness. If you’re still facing issues with your strip lights not sticking properly, it may be worth considering mechanical attachments such as mounting brackets or clips for a more permanent solution.
Unveiling the Art: Advanced Techniques in Connecting Strip Lights
As you delve deeper into the world of strip lights, you may find yourself yearning for more complex configurations and layouts. Indeed, this is where advanced techniques come into play. They allow more flexibility and creativity, transforming your humble abode or landscape lighting into a stunning spectacle.
One fascinating technique to explore is understanding how to connect LED strip lights when cut. This opens up a realm of possibility, as it allows you to create custom designs or fit the lights into unique spaces. To achieve this, after cutting the strips at the indicated cut points, solderless connectors can be used. These come in various types, such as ‘L’ shape or ‘T’ shape connectors for different layout needs.

Another widespread query is whether we can connect an LED strip from either end. The answer largely depends on the type of LED strip light being used. Single-color and CCT strips can be powered from either end or both ends, but for RGB and other color-changing LEDs, it’s best to power from one end only to ensure consistent color throughout your installation.
Expanding further on how to connect LED strip lights together demonstrates additional possibilities. You could use a single power supply for multiple strips by connecting them in parallel – this means that each strip gets the same voltage and is independent of others in the circuit. However, there are limits; always check how many LED strip lights can be connected without exceeding power supply capacity.
Mastering how we connect LED strips directly to power also proves beneficially advanced knowledge. For instance, if you’re using low-voltage LEDs (like 12V or 24V), they must be paired with a proper transformer that reduces mains voltage down to their level.
Conclusion: How To Connect Strip Lights?
Understanding how to properly install and manipulate these versatile landscape strip lights leads not only to aesthetic satisfaction but also to a sense of achievement. This guide provided foundational knowledge, and by exploring advanced techniques, you can turn your lighting visions into reality.
Whether it’s connecting cut LED strip lights or understanding how many LEDs can be connected to a single power source, there’s always room for innovation and individuality. So, let this acquired knowledge guide your journey through the creative landscape of strip lighting. Remember, the only limit is your imagination.
You may also be interested in the following posts: