Lighting the Path: Understanding Low-Voltage Landscape Lighting
Low-voltage landscape lighting, a form of outdoor illumination, employs electrical fixtures that operate at a significantly reduced voltage compared to standard household circuitry. The term ‘low-voltage’ typically refers to electrical systems that function at 12 or 24 volts, substantially lower than the traditional line voltage of 120 volts alternating current (VAC) in most residential applications.
This reduction in voltage is achieved by using a transformer that steps down the standard voltage to a safer, more manageable level. This type of lighting serves diverse aesthetic and functional purposes. It can be used to highlight architectural features, illuminate pathways for safety, or create ambiances in outdoor living areas. The versatility and safety provided by low-voltage landscape lighting have made it an increasingly popular choice among homeowners and professional landscapers alike.
The Invisible Thread: Splicing Wires for Lighting
Effective wire splicing lies at the heart of any successful low-voltage landscape lighting system. Essentially, wire splicing involves connecting two or more wires together to allow electricity to flow uninterrupted between various components within an electrical circuit. Proper wire splicing not only ensures optimal operation but also extends the lifespan of your landscape lighting system.
By creating firm electrical connections between wires, it minimizes potential points of failure such as shorts or breaks in the circuit that could lead to malfunctions or complete system breakdowns. Moreover, since low-voltage systems are often exposed to outdoor elements – moisture, temperature fluctuations, and physical disturbances – robust wire splices are crucial for maintaining the long-term integrity and performance of your lighting installation.
Safety First: Handling Electricity with Care
Despite its lower risk profile compared to line voltage systems, working with low-voltage landscape lighting still requires certain precautions due to its inherently electric nature. Before embarking on any wire splicing task, it is imperative to turn off the power supply to the lighting circuit.
Most low-voltage landscape lighting systems are connected to a transformer, which should be unplugged or switched off at the circuit breaker. This simple step can greatly reduce the risk of an electrical shock. It is also advisable to wear appropriate protective gear when working with electrical wiring. This could include rubber-soled shoes and insulated gloves for added safety.
Moreover, keeping your work area clean and organized can prevent accidents such as tripping or unintentional contact with live wires. Always abide by local codes and regulations pertaining to electrical work – they are designed for your safety and that of others around you.
Understanding low-voltage landscape lighting systems paves the way towards proper wire splicing techniques that guarantee optimal functioning and longevity of your outdoor lighting setup. Despite their low-risk nature, it’s essential to practice safety precautions when dealing with these electrical systems, ensuring a safe working environment while maximizing system performance.
Understanding the Basics of Low-Voltage Landscape Lighting Wires
A Closer Look at Wire Types
The world of low-voltage landscape lighting often navigates through varying types of wires. Understanding these wires is the first step towards successful splicing. Primarily, you’ll encounter stranded or solid wires.
Stranded wires, composed of several small strands bundled together, are typically more flexible and less prone to breakage from bending. They are ideal for applications where the wire needs to curve around obstacles or in settings where movement may occur.
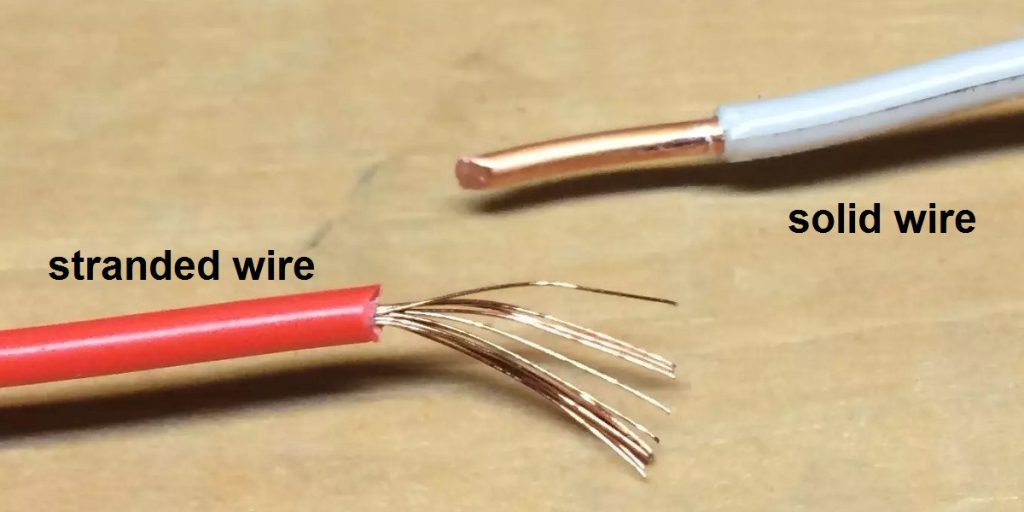
On the other hand, solid wires consist of a single solid strand that offers a lower resistance path for electricity flow, making them more efficient over long distances. However, their lack of flexibility makes them more susceptible to damage from constant movement or bending.
The choice between stranded and solid wire depends on your specific landscape lighting needs. Factors such as distance covered, fixtures used, and environmental conditions play a significant role in determining the best fit.
Deciphering Wire Specifications
Wire specifications can seem like complex jargon to the uninitiated but are crucial elements in understanding wire performance and compatibility. The gauge number represents one intrinsic specification; it refers to the diameter or thickness of the wire. A fundamental principle here is that as gauge numbers increase, wire thickness decreases.
Another salient specification is voltage rating, which indicates how much electrical pressure a cable can safely handle without overheating or breaking down its insulation. For low-voltage landscape lighting systems operating at 12V-24V, suitable wiring would have an appropriate voltage rating. Comes insulation type, which plays a pivotal role in how well your cable can withstand physical stress and environmental factors such as moisture and temperature variations.
The Role Transformers Play
In low-voltage landscape lighting systems, transformers perform an indispensible function: they adjust incoming high-voltage (120V to 277V in the U.S.) to a safer, functional low-voltage (usually 12V or 24V). These transformers are crucial as they allow the use of low-voltage lights, which are safer, more energy efficient, and more versatile compared to their high-voltage counterparts.
The transformer’s capacity, measured in watts, is critical, as it must be sufficient to power all your lighting fixtures combined. Overloading a transformer can lead to decreased lifespan for both the transformer and your lighting fixtures due to overheating and excessive wear. It’s also vital that any transformers used outdoors be rated for exterior use. They should have suitable enclosures that offer weather resistance while maintaining ventilation for heat dissipation.
For added convenience, modern transformers often come with features like timers and photocells for automated control of your landscape lighting. Understanding these basic elements concerning wire types, their specifications, and the role of transformers leads you to successful splicing and effective operation of your low-voltage landscape lighting system.
An Arsenal of Tools: Essentials for Wire Splicing
Wire Strippers: The Art of Revealing Copper
The first indispensable tool we need to discuss is the wire stripper. This humble hand-held device is a constant companion when it comes to any electrical wiring work. Stripping wires may appear to be an easy task, but employing the right tool elevates the process from mundane to meticulous. Different types of wire strippers are available, each designed for a specific task.
There are manual wire strippers that look similar to scissors and are perfect for simple tasks where precision isn’t paramount. However, because we’re dealing with low-voltage landscape lighting wires, which often demand accuracy, self-adjusting or automatic wire strippers are highly recommended.
Automatic wire strippers adjust based on the gauge and insulation thickness of the wire, ensuring minimal damage to the underlying copper strands. They not only make stripping easier but also more efficient and safer.
A good pair will quickly become your best friend during any splicing operation. Besides stripping, some models feature cutting and crimping capabilities too – an added bonus that can come in handy while working with landscape lighting wires.
Remember though not all wires are created equal; therefore, having a high-quality wire stripper that can handle varying sizes and specifications is essential. A proficient worker needs proficient tools – wire strippers underline this principle by being excellent conductors of accuracy in an otherwise electrifying task!
Waterproof Wire Connectors: The Unsung Heroes
Moving on to our next crucial tool: waterproof wire connectors. These seemingly inconsequential pieces play a pivotal role in landscape lighting installation by ensuring safe and stable electrical connections while braving outdoor conditions.
The importance of waterproof connectors cannot be overstated. They shield the spliced wires from moisture, corrosion, and even insect intrusion – all common threats in an outdoor landscape environment. Without them, your beautiful lighting setup would be at the mercy of the elements.
When selecting these connectors, two aspects are paramount: compatibility with your wire size and a proven record of water resistance. Also, look for connectors that support easy installation. Some models come with pre-filled silicone, which further enhances their water-blocking abilities. A quality connector will not just provide a secure connection but also ensure its longevity by being resistant to heat, cold, and UV rays.
A wise investment in superior waterproof connectors will save you time and money spent on frequent repairs caused by substandard connectors. In essence, waterproof wire connectors are the unsung heroes of low-voltage landscape lighting installations: they quietly do their job ensuring your lights keep shining bright come rain or shine!
Voltage Meter: The Silent Sentinel
Last but certainly not least in our arsenal of tools is the voltage meter – an often overlooked yet vital part of any electrical project. Its role is similar to that of a sentinel who watches over your wiring system’s health.
A voltage meter measures the electric potential difference between two points in an electric circuit. In simpler terms, it tells you whether electricity is flowing through a circuit and how much power it carries – both crucial aspects to ensure a successful splice. For low-voltage landscape lighting systems specifically, using a voltage meter is vital as it allows you to check if power is indeed reaching each light fixture after the splicing process has been completed.
In case there’s an issue with power supply or output, the reading from the voltage meter will help pinpoint where troubleshooting needs to occur. Moreover, understanding how to interpret readings from this tool can prevent potential damage due to overloading or underloading.
Despite being understated in its presence, a voltage meter’s contribution to any wiring process is substantial. A voltage meter might seem like a small player in the grand scheme of landscape lighting installation. But without its crucial data, even the most well-executed splice may not yield the desired results: an exquisitely lit landscape.
The Intricate Work: A Step-by-Step Guide to Splicing Low-Voltage Landscape Lighting Wires
Preparing the Wires for Splicing: The Art of Stripping and Twisting
The first step in our splicing journey involves preparing the wires – a critical stage that sets the foundation for the success of your project. This process involves stripping – removing the insulation layer to expose a portion of the metal wire. One must be meticulous during this process, as it is easy to inadvertently compromise the integrity of the wire if too much force is used or if an incorrect tool is employed.
The right wire stripper will have different holes corresponding to different wire gauges, allowing you to choose an appropriate size without damaging any internal strands. The second crucial part of preparing your wires involves twisting. After you have exposed enough bare wire by stripping, you should twist these stripped ends together. Why is this important?
Twisting not only helps keep multiple strands of a single wire together but also ensures that there is a secure metal-to-metal contact, which becomes essential when applying connectors. Now that we know how vital stripping and twisting are, let’s focus on uniformity in preparation.
Uniformity means consistency in exposing equal lengths of bare wires and similar tightness in twisting them across all your landscape lighting fixtures. This attention to detail creates uniform connections throughout your landscape lighting system, reducing potential voltage drops and promoting longevity in your system.
A Waterproof Union: Splicing Wires Using Waterproof Connectors
After successful preparation comes splicing – the act of combining two separate wires into one continuous electrical pathway with waterproof connectors’ assistance. These handy devices are designed specifically for outdoor use and can provide reliable watertight seals that prevent moisture from infiltrating your connections.
Using waterproof connectors can be straightforward but requires diligence nonetheless. First, insert each stripped end into opposite sides of the connector, ensuring the metal contacts are touching. Next, screw the connector cap on tight; this compresses an internal gel, creating a waterproof seal around your freshly combined wires. Yet this process can come with pitfalls for the unwary.
One common mistake is stripping too much insulation off your wires; this can lead to bare wire protruding from your connector and potential short-circuits or corrosion down the line. Another error involves not twisting wires together before inserting them into connectors, leading to unreliable connections.
Pulse of your System: Testing Connections with a Voltmeter
The final part of our splicing journey deals with a necessary verification step: testing connections using a voltmeter. This device measures the electric potential difference between two points in an electrical circuit and is instrumental in detecting any wiring faults post-splicing.
You might wonder how to use such a piece of equipment effectively. The answer lies in understanding its basic operation principles and following safety precautions keenly. To measure voltage at your spliced connection, set your meter to measure AC voltage (usually denoted as V~), then connect each probe to one wire at your connection point.
Interpreting readings on a voltmeter may seem daunting for beginners; however, it’s simpler than it appears. A correct reading should be close to the output rating of your transformer – 12 volts for most low-voltage landscape lighting systems. If you get no reading or one significantly lower than expected, you likely have a fault that needs addressing.
Special Tips for Successful Wire Splicing in Landscape Lighting
The Imperative of Ensuring Proper Waterproofing for Outdoor Wiring
In the realm of landscape lighting, proper waterproofing is not merely necessary; it is essential. Outdoor elements present a variety of threats to electrical connections, from condensation and rain to snow and ice. If water infiltrates the wires, it can result in short circuits or corrosion, both potentially debilitating your lighting system.
Consequently, using waterproof wire connectors is a must in landscape lighting. Waterproof connectors usually come equipped with silicone-filled tubes that create a water-resistant seal around the wire splice when compressed. However, for added protection against moisture infiltration, you may consider using self-fusing silicone tape to wrap around the completed splice and connector. This tape fuses with itself upon contact and forms an airtight seal.
Despite these precautions, positioning also plays a crucial role in waterproofing outdoor wiring. Always endeavor to place wire splices above ground level whenever possible or within watertight junction boxes if underground placement is unavoidable. The aim here is to minimize direct exposure to groundwater or rainwater runoff. A periodic inspection should be performed after any significant weather event, such as heavy rains or snowfall, to ensure the integrity of your wiring’s waterproofing remains intact.
Spotting potential issues early allows you ample time to perform necessary repairs before they escalate into major problems. Ultimately, ensuring proper waterproofing demands vigilance and proactive steps at every stage – from splice creation through placement up to regular inspection – but it pays off by guaranteeing the longevity of your landscape lighting system.
Preserving Correct Polarity While Connecting Wires
In low-voltage landscape lighting systems, correct polarity must be maintained during wire splicing for optimal functionality. As most low-voltage cables are polarized – meaning they have distinct positive (typically marked) and negative (unmarked) wires – matching these correctly during splicing is paramount.
When splicing, always connect the marked wire from the power source (transformer) to the marked wire of the light fixture. Likewise, pair up the unmarked wires. Failure to do so may result in some fixtures not lighting up due to a phenomenon known as reverse polarity. Reverse polarity, while typically not dangerous in low-voltage systems, can cause certain types of lights to malfunction or shorten their lifespan.
Therefore, maintaining correct polarity is less about safety and more about ensuring your landscape lighting works as intended and enjoys an extended service life. When you face an instance where polarities are not clearly indicated on a cable, use a multimeter tool.
It will help determine which wire is positive and which one is negative by displaying a positive or negative reading depending upon the leads’ connection. The art of splicing requires meticulousness and precision in preserving correct polarity – a seemingly minute detail that greatly impacts our lighting‘s operational efficiency.
The Crucial Role of Regular Maintenance and Inspection
Maintenance forms an integral part of any electrical system’s lifetime journey – low-voltage landscape lighting included. Ensuring your outdoor lights remain functional and aesthetically pleasing demands regular inspection and prompt remediation efforts if issues arise.
Start with routine visual inspections for any visible signs of wear or damage on both light fixtures and cables connecting them. This includes looking out for frayed wiring, burnt-out bulbs, corroded connections, cracked fixtures or lenses, etc., which might indicate underlying problems requiring prompt attention.

Further inspection should involve testing each light fixture individually with a multimeter to ensure it receives appropriate voltage levels for operation – an essential step given that low-voltage lighting systems rely on specific voltage levels for optimal performance. Any significant deviation observed should be investigated immediately, as it could signify issues like improper wiring or transformer malfunctions.
In addition to these steps, maintain cleanliness around your light fixtures. Accumulated debris or dirt can diminish the brightness of your lights and even pose potential fire hazards in extreme cases. Furthermore, overgrown vegetation can obstruct light, thereby defeating the purpose of your landscape lighting.
Consider scheduling professional inspections annually for a comprehensive review and maintenance of your lighting system. A trained eye may spot hidden issues that you might overlook and subsequently provide necessary solutions. In essence, regular maintenance and inspection are not merely reactive measures to fix existing problems; they are proactive strategies that ensure continued enjoyment of your beautifully lighted landscape.
Case Study: Troubleshooting Common Problems in Spliced Wires
Identifying and Resolving Wire Splicing Dilemmas
Missteps during the wire-splicing process can lead to a plethora of issues. One such common problem is flickering or non-functioning lights, often attributed to a loose or poor connection. In such cases, it’s prudent to recheck the splice and ensure that the wires are firmly connected within the waterproof connector. If found loose, they ought to be restripped, retwisted, and reconnected.
Another recurrent issue with low-voltage landscape lighting is unexpected dimness in some lights. This could potentially be due to a voltage drop caused by excessive cable length or an inappropriate wire gauge used for the connection. The remedy lies in either shortening the cable length (if feasible) or upgrading to a thicker gauge wire that can handle more current without loss.
In scenarios where lights don’t turn on at all despite successful splicing, it may signify an issue with the transformer itself – perhaps it’s not supplying power as required. Herein, testing with a voltmeter becomes crucial; if no power is detected on output cables from the transformer, one might need professional help for repair or replacement.
Yet another scenario might involve corrosion of connectors due to constant exposure to moisture and dirt in an outdoor environment. Regular inspection becomes imperative here; any signs of corrosion should instantly warrant replacement of connectors before it deteriorates overall system performance.
Incorrect polarity while splicing can also result in problems like system failure or reduced lifespan of bulbs. Maintaining correct polarity while connecting wires ensures smooth functioning, usually indicated by markings on wires, which must be adhered to strictly during connection.
Conclusion: How Do We Splice Low-Voltage Landscape Lighting Wires?
Wire splicing plays a pivotal role in installing low-voltage landscape lighting systems effectively and efficiently. While it may initially seem daunting, with the right tools, understanding of basic concepts, and meticulous attention to detail, one can master this skill. Moreover, being aware of potential problems and how to troubleshoot them empowers you to maintain your lighting system independently and ensure its longevity.
Remember, a well-lit landscape enhances not only the aesthetics of a place but also provides safety during nighttime hours. Thus, as we illuminate our surroundings with low-voltage landscape lighting, we simultaneously foster a climate of warmth and security, demonstrating the power of light in our lives.
You may also be interested in the following posts: