Revealing the Art of Landscape Lighting
Landscape lighting is a creative art of lighting that enhances the aesthetic appeal and functionality of outdoor spaces during the night. The technique highlights architectural features, creates cozy atmospheres for social gatherings, and ensures safer pathways. Not simply confined to lighting beautiful gardens or walkways, it’s also employed in illuminating structures like patios, decks, and fences.
By casting light strategically on specific areas and creating shadow effects elsewhere, landscape lighting can magically transform ordinary places into enchanting spaces. However, the elemental magic behind these lighted landscapes lies in an often overlooked aspect: the precise wiring and connection of these lights. The seamless interlinking of individual lights to form an interconnected system requires careful attention to detail.
In this kaleidoscopic world of luminosity where darkness meets light, there’s a tremendous amount at stake. Ensuring proper connections not only guarantees optimal performance but also promises longevity for your landscape lighting system. This guide is designed to shed light on how the complex yet essential task of splicing landscape lighting wires is accomplished. So let’s delve deeper into this enlightening journey.
The Brilliance Behind Wire Splicing: An Essential Skill
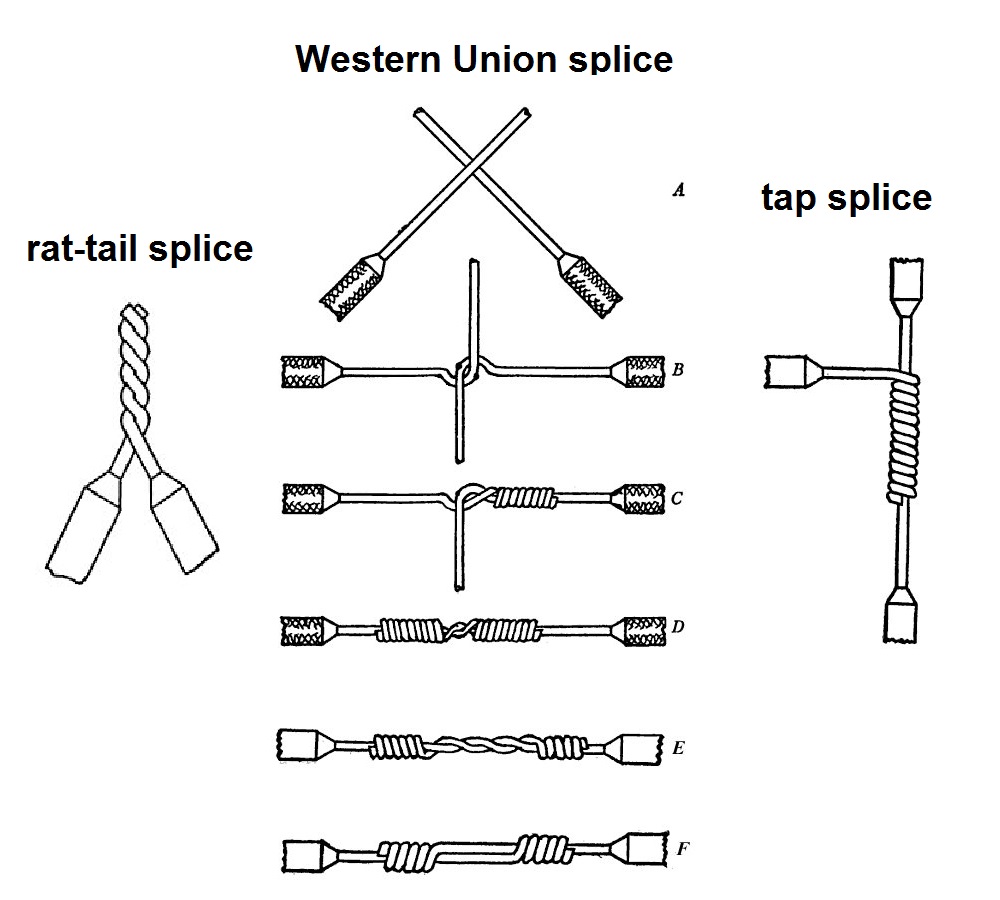
Wire splicing refers to the process of connecting two or more wires by intertwining their stripped ends and securing them with a connector or splice. This technique forms an integral part when installing or repairing landscape lighting systems, as it enables electricity to flow seamlessly from power source to each fixture.
The importance of proper wire splicing cannot be overstated. Substandard splices are one primary cause for faulty electrical circuits, which may lead to flickering lights, short-circuiting, or even a complete blackout in your beautifully lit outdoor space.
Moreover, since most landscape lighting systems are installed outdoors, they are continuously exposed to the vagaries of nature. Hence, efficient wire splicing with robust connections could prevent moisture intrusion and corrosion, ensuring the longevity and durability of your lighting system.
A well-executed splice not only ensures uninterrupted power supply but also maintains an even spread of voltage across all fixtures. This is essential in landscape lighting to prevent some lights from being overly bright while others appear dimmer.
In essence, mastering the art of wire splicing is not just about creating strong electrical connections; it’s about ensuring that every lamp in your landscape shines brightly with equal vigor. Hence, let’s illuminate our path further by understanding various aspects related to landscape lighting wires.
Understanding Landscape Lighting Wires
A Deeper Dive into the Types of Wires Used in Landscape Lighting
In the realm of landscape lighting, two primary types of wire are predominantly utilized: low-voltage and line-voltage. Low-voltage wires, as the name suggests, carry a lower amount of electrical current, typically around 12 to 24 volts. These wires are generally safer to handle and less likely to cause severe harm if accidentally severed or damaged.
Line-voltage wires, on the other hand, transmit a significantly higher voltage – roughly 120 volts in a standard residential setting. These potent cables are employed for more substantial lighting systems or those requiring extensive power. Yet due to their elevated voltage levels, they pose a higher risk when mishandled and necessitate careful attention during installation and maintenance.
The Significance Behind Wire Gauges
Wire gauges refer to the diameter or thickness of the wire used for electrical circuits, with each gauge number corresponding inversely to its size – meaning larger numerical values signify thinner wires. In landscape lighting applications, wire gauges typically range from 8 gauges (the thickest) to 16 gauges (the thinnest).

The choice of appropriate wire gauge plays an instrumental role in ensuring landscape lighting operates optimally and safely. Thicker wires can transport electricity over greater distances without significant energy loss – a phenomenon called “voltage drop”. Conversely, using thinner wire for extensive runs may result in dimmer lights at the end of the circuit due to this voltage drop.
Decoding Landscape Lighting Wire Colors
A key aspect integral to successful wire splicing is understanding the color coding system associated with wiring schemes. While variations exist depending on regional standards or manufacturer’s designations, there are three universally recognized color codes that prevail: black (or red), white, and green (or bare copper). The black wire, also known as the “hot” wire, is responsible for transmitting electricity from the power source to a device or light fixture.
The white wire – otherwise dubbed the “neutral” wire – serves as a return path for this current. Together, these wires complete the electrical circuit. And there is the green or bare copper wire, which stands as the ground wire. This safety-conscious component exists to direct any stray electrical currents safely into the earth, mitigating potential hazards such as shocks and fires.
Navigating through landscape lighting wires requires more than a novice understanding of their color codes – it demands a comprehensive understanding of their distinct roles in an electrical circuit. Armed with this knowledge, you are well-equipped to tackle splicing tasks with both safety and efficacy at your forefront.
Tools Required for Effective Splicing
To perform a successful splicing job, certain tools are crucial. These tools ensure efficiency, ease of work, and most importantly, a safe operation.
The first tool that should be in your arsenal is a wire stripper. This invaluable tool is responsible for removing the protective coating from the wires, which facilitates a clear path for electricity to flow unabated.
Arguably as crucial as wire strippers in this procedure are wire cutters. Wire cutters serve the essential function of trimming the wires to an optimal length required for splicing. They come in different sizes and types according to the nature and thickness of the wires involved.
Following wire strippers and cutters, silicone-filled wire nuts or connectors are another important tool used during splicing. These devices not only secure your spliced connection but also create an impermeable seal preventing moisture intrusion, which aids longevity. Their use is prevalent due to their ease of use and effectiveness.
Last but not least, we have electrical tape. This trusted ally provides an additional layer of insulation and security once you’ve made your splice with connectors or nuts, ensuring that there’s no exposed conductive surface that might be hazardous.
Safety First: Precautions Prior to Splicing
When engaging in any electrical task, safety should top your priority list. As it pertains to landscape lighting wire splicing, the first order of business is turning off power supply from its source; this mitigates against unsuspected electric shocks that can be lethal or cause serious harm.
In addition to shutting down the power supply prior to commencing work, using insulated tools can’t be overemphasized enough! These special tools offer protection by providing electrical insulation, thereby reducing shock risks exponentially when handling live cables inadvertently left energized.
Moreover, using appropriate protective gear, like insulated gloves, can reduce the risk of injury even further. These gloves are designed to resist electricity and keep your hands safe while you work.
Step-by-Step Guide to Splicing Landscape Lighting Wires
The process of splicing landscape lighting wires involves several meticulous steps, which should be followed with utmost accuracy for effectiveness.
The first step is cutting and stripping the wires; this is accomplished using our previously discussed tools: wire cutters and strippers. Care should be taken to ensure the wire isn’t damaged during this process.
With wires properly stripped, next is twisting together the same-color wires. This facilitates a proper connection between corresponding positive and negative charges, which will result in a successful lighting operation.
Once twisted together, applying wire nuts or connectors on top of these twisted pairs will serve dual purposes of securing the splices as well as sealing off any exposed conductive parts.
To ensure additional security after application of wire nuts or connectors, wrapping the splice with electrical tape comes next. This action prevents any accidental exposure that could be hazardous.
Troubleshooting Common Issues in Spliced Landscape Lighting Wires
Landscape lighting wiring issues often arise from improper installation, material failure, or environmental impact. For instance, fixing loose connections might involve re-twisting and securing your splices with new connectors or nuts, then reapplying electrical tape for insulation.
Corroded wires are another common issue that can affect your landscape lighting system’s performance negatively due to increased resistance hindering optimal electricity flow; they may require complete replacement where necessary for robustness of power transmission.
A common mistake made by many is addressing improper wire gauge usage. The size (or gauge) of your wiring plays an integral role in how effectively electricity is distributed through your system. Understanding the right gauge that suits your lighting needs will ensure you have a system that runs optimally and safely.
Advanced Techniques in Wire Splicing
While conventional methods of wire splicing can be effective, there are other advanced techniques that offer enhanced benefits. For example, soldering is a technique where a filler material (solder) is melted around the connection to form a more permanent and conductive joint.
Another sophisticated method involves using heat shrink tubing for waterproofing splices. Once shrunk by heat, this tubing forms a watertight seal around your wire splice, making it ideal for external installations like landscape lighting systems, which are susceptible to varying weather conditions.
Maintaining your Spliced Landscape Lighting Wires
The longevity and performance of your landscape lighting system depend largely on how well it’s maintained. Regular inspection of connections and cleaning tips can go a long way in ensuring an efficient system while also detecting problems before they escalate.
In cases where issues persist despite troubleshooting efforts or if the initial installation appears too complex, consider seeking professional help. It’s better to incur some cost than to risk severe damage or injuries trying to handle complex wiring tasks with inadequate knowledge or skills.
Conclusion: How Do We Splice Landscape Lighting Wires?
To conclude, the process of splicing landscape lighting wires isn’t daunting when armed with proper tools and knowledge. Regular maintenance practices coupled with sound troubleshooting methods will contribute significantly towards keeping your landscape lit up beautifully for years to come.
The journey towards mastering electrical wiring may seem strenuous, but remember – every expert was once a beginner! Continue learning and practicing until you become proficient; after all, practice makes perfect!
Further Reading Recommendations
If you’ve made it this far into our discussion on splicing landscape lighting wires, it’s obvious you’re keen on expanding your knowledge in this area. Here are some books we recommend for further reading: “Electrical Wiring Residential” by Ray C. Mullin and Phil Simmons, “Wiring Simplified” by H.P Richter and W.C Schwan, and “Black & Decker Complete Guide to Wiring” by Editors of Cool Springs Press.
You may also be interested in the following posts: