Introduction to Low-Wattage Landscape Lighting Installation
A Brief Glimpse into the World of Landscape Lighting
As the sun dips below the horizon, an enchanting spectacle unfolds across your garden. Shimmering lights punctuate the darkness, gracefully accentuating architectural elements, illuminating paths, and breathing life into your outdoor spaces. This is the magic of landscape lighting, an art form and science that transforms outdoor environments into nocturnal wonderlands.
Landscape lighting comprises a broad spectrum of lighting techniques used to enhance and beautify outdoor spaces after dusk. Rooted in creativity and guided by practicality, it orchestrates a delicate interplay between light and shadow that enhances visibility, accentuates aesthetic appeal, and promotes safety.
It’s not just about flooding a yard with light; it’s about strategically placing luminous accents to create visual harmony. A beautifully lit landscape can elevate ordinary gardens to extraordinary levels. It can make homes appear more inviting while deterring potential intruders. More than a mere decorative element, it’s a tool that can dramatically boost visual appeal and property value.
The Lure of Low-Wattage Landscape Lighting: Benefits Galore
Low-wattage landscape lighting represents one of the most exciting developments in this field. As its name suggests, low-wattage lighting operates on less power than traditional systems while offering equivalent or even superior performance. Several compelling advantages make low-wattage landscape lighting an attractive choice for homeowners.
Foremost among these is energy efficiency. Consuming far less electricity than standard fixtures, these lights minimize energy expenditure without sacrificing brilliance or coverage – perfect for those who seek beauty without burdening their wallets or the environment.
Low-wattage lights are generally easier to install due to their lower power requirements – no need for heavy-duty cables or complex wiring systems. They also run cooler than conventional bulbs, reducing fire risks and making them safer overall, which is paramount when dealing with outdoor electrical installations.
Safety First: Precautions to Keep in Mind
While low-wattage landscape lighting is generally safer than its high-voltage counterparts, due diligence is still necessary to ensure safe installation and operation.
Firstly, it’s crucial to remember that water and electricity make a dangerous mix. Hence, all fixtures should be weatherproofed adequately, particularly if they are positioned near water bodies or sprinkler systems. Moreover, cables must be buried safely underground to prevent accidental damage.
Secondly, as with any electrical installation, it’s essential that the power source be switched off before beginning work. This eliminates the risk of electric shock during installation.
Thirdly, consider investing in fixtures made from durable materials like brass or copper, which withstand weather elements better than cheaper alternatives. Doing so will reduce potential risks associated with material degradation over time.
Always remember that while DIY can be rewarding and cost-effective, it should never compromise safety. If you’re unsure about any aspect of the installation process – whether it’s choosing the right transformer capacity or configuring wiring connections – don’t hesitate to enlist professional help.
Unveiling the Essence of Low-Wattage Landscape Lighting
Understanding low-wattage landscape lighting requires an exploration into its defining characteristics, types, and potential advantages and disadvantages. It is essential to grasp these facets thoroughly before embarking on your journey of lighting your landscape.
Shedding Light on the Definition and Explanation of Low-Wattage Lights
Low-wattage lights, as the name suggests, operate with a smaller amount of electrical power, or watts. These types of lights are designed to consume less energy than their high-watt counterparts whilst still providing ample illumination. The term ‘watt’ serves as a unit for measuring power, often denoted as the rate at which electricity is used over time.
In terms of lighting, this means that less energy consumption translates to lower electricity bills without sacrificing light quality or effectiveness. This kind of efficiency makes low-wattage lights an alluring option for many homeowners who wish to enhance their landscapes aesthetically while maintaining eco-friendly practices.
Low-wattage lights also contribute significantly towards extending bulb longevity. Since they utilize less energy and generate less heat compared to high-wattage bulbs, they tend to have longer life spans – an aspect that can reduce maintenance costs over time.
The Luminary Triad: LED, Solar, and Halogen Lights
Now let us delve into the primary types of low-wattage lights available in today’s market: LED (light-emitting diode), solar, and halogen bulbs. LED lights are a champion among today’s efficient lighting options since they consume very little power while providing bright illumination. They are renowned for their durability – lasting up to 50 times longer than traditional light sources – and consistency in color temperature.
Solar lights take sustainable lighting solutions a notch higher by harnessing sunlight through photovoltaic cells during daytime hours, which then powers the bulb at nightfall. They are excellent choices for homeowners keen on reducing environmental footprints.
Halogen lights, while still considered low-wattage compared to traditional incandescent bulbs, might appear less efficient than LED or solar alternatives. However, they generate a bright and warm light that can be ideal for highlighting specific landscape features.
Lighting the Way: Pros and Cons of Low-Wattage Lights
The merits of using low-wattage lights are numerous. For starters, they are energy-efficient, which not only helps conserve valuable resources but also translates to significant cost savings in the long run. They offer ample lighting power for most outdoor applications with minimal heat production, hence safer to touch – a considerable advantage when children or pets frequent your yard.
Also, these lights tend to attract fewer insects since they radiate less heat than traditional lights – a boon during warmer seasons when bugs can become quite a nuisance. The reduction in heat also extends bulb life, which means fewer replacements over time – a plus for convenience and sustainability. However, like anything else under the sun, low-wattage lighting has its drawbacks.
While LEDs and solar lights offer excellent efficiency levels and longevity, they come with higher upfront costs compared to conventional lighting solutions. This may deter some homeowners, although the long-term benefits often outweigh this initial expenditure.
Halogen bulbs too have their share of cons despite their bright light output – they consume more power than LEDs or solar lights and have shorter lifespans – factors that could lead to higher maintenance costs in the long run. Furthermore, their surface temperatures can get rather high after extended use, which poses a risk if touched unwittingly.
Shedding Light on Your Intentions: Determining the Purpose of Your Landscape Lighting
Creating an enchanting landscape lighting design begins with defining your purpose. Knowing why you want to light your yard will guide every decision you make afterwards. The first objective many homeowners have is safety. Well-lit paths can prevent falls or other accidents, and strategic lighting can deter potential intruders by eliminating hiding spots in darker corners of the yard.
Another common goal is to create an ambiance. Light has a profound effect on mood, and with careful planning, you can evoke a sense of calm, cheerfulness, or even mystique in your outdoor space. Highlighting features is another worthwhile purpose for landscape lighting.
Whether it’s a majestic tree, a charming garden statue, or the clean lines of your home’s architecture, judicious use of light can emphasize these elements. Remember that these purposes are not mutually exclusive; most exceptional landscape designs artfully blend them.
Envisioning Lighting: Sketching the Yard and Identifying Key Features
After identifying the intent behind your lightscape design, it’s time to take pen to paper – or cursor to screen if you prefer digital methods – and sketch out your yard and its key features.
Begin by drawing a basic outline of your property boundaries and including any significant structures, such as your house, garage, or shed. This sketch doesn’t need to be architectural-grade but should maintain approximate proportions for accuracy’s sake.
Next plot major natural elements like trees, bushes, or notable landscaping features such as flower beds or ponds on this map. Pay attention also to pathways that meander through these areas since they may require lighting for safety reasons.
Also consider manmade features such as decks, patios, or gazebos, which are focal points that could benefit from spotlighting because they serve as gathering areas during social events at night.
Last but not least, mark out potential dark spots that could serve as hiding places for intruders. These zones need to be well-lit as a deterrent against any unwelcome visitors.
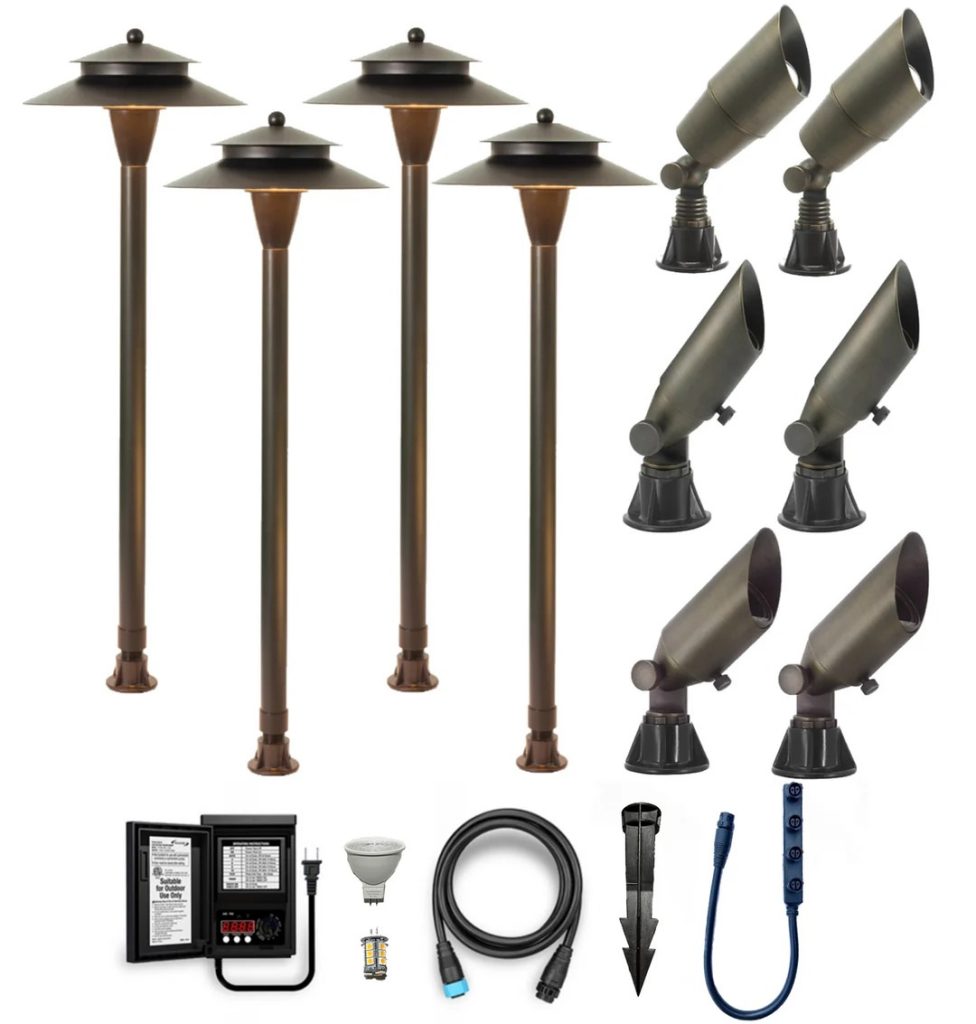
Choosing Your Lighting Arsenal: Selecting the Right Types of Fixtures
Armed with a clear purpose and a physical map of your yard, you are now ready to choose the proper lighting fixtures. The world of outdoor lighting is vast, featuring many styles that can cater to just about any purpose or aesthetic preference.
Path lights are an excellent choice for marking the edges of walkways and driveways. They provide a soft spread of light that guides visitors from one point to another safely and creates an inviting atmosphere.
Spotlights offer more direct, concentrated light, making them ideal for highlighting specific architectural or natural features in your yard. For instance, if you have a magnificent oak tree or an artistic garden statue that deserves attention even after sunset, spotlights can bring these elements into focus.
Floodlights emit bright and broad illumination over large areas, making them perfect for security purposes. They eliminate shadowy corners around your property where potential intruders might lurk unseen.
There are also specialty lights, such as underwater lights for water features like fountains or ponds or hardscape lights that illuminate structures like decks and gazebos. Remember that a successful landscape lighting design often involves combining several types of fixtures effectively.
Calculating Power Requirements
Navigating the Maze of Electrical Needs
When planning to install low-wattage landscape lighting, understanding and calculating power requirements is an essential step. This stage can be likened to the blueprint of a proposed architectural structure. Low-wattage lights normally consume less energy, thus making them more economical. However, it does not imply that their power requirements should be taken lightly.
The first step in this process is understanding how much power your lights will need. To do this, you must examine the wattage of every individual light fixture that you plan on installing. The combined total gives you a rough estimate of the power needs for your entire system.
At this point, it’s crucial to remember that each light doesn’t work independently; instead, they form part of an interconnected system. Hence, the total wattage isn’t just about adding up numbers; it is about ensuring all the fixtures will function optimally without overloading or underwhelming your transformer.
Once you’ve determined this number, it’s prudent to add a bit more to cater for potential expansions or adjustments in your landscape lighting system down the road. A good rule of thumb is to add an extra 20% to your calculated total.
This addition provides some leeway and flexibility for future adjustments without necessarily upgrading the entire system. While calculating the total wattage required for your plan from individual fixtures might seem tedious and unnecessary, especially with low-wattage LED lights, which usually consume less than 5 watts per bulb, it helps ensure precise matching with transformers, which are often available in common sizes such as 75W, 100W, 150W, 200W, or 300W.
Understanding Voltage Drop and Its Importance in Landscape Lighting
The Silent Killer of Outdoor Lighting Effectiveness
Voltage drop is a noteworthy aspect when discussing power requirements in low-wattage landscape lighting. However, its importance is often downplayed or downright ignored, leading to less than optimal lighting outcomes.
Voltage drop refers to the decrease in electrical voltage experienced as electricity travels along a wire. It’s an inevitable occurrence in any electrical system, but it carries more weight in low-voltage lighting systems where even minimal loss can considerably affect performance.
In landscape lighting, an excessive voltage drop could result in dim lights or uneven brightness across your fixtures. This phenomenon typically occurs when lights are located too far from the transformer or when wires are too thin for the amount of power they’re intended to carry.
Addressing voltage drop starts by recognizing that it’s not just about maintaining consistent brightness across all fixtures; it’s also about enhancing energy efficiency and extending the lifespan of your light bulbs. If left unchecked, excessive voltage drops might lead to frequent bulb replacements and inflated energy bills.
One effective way of managing voltage drop is by using thicker cables for longer distances from the transformer and splitting up your total wattage between multiple runs off your transformer instead of one long loop. Another method is installing multiple transformers throughout your yard if you have numerous lights spread out over a larger area.
How to Calculate Total Wattage Needed for Your Plan
Breaking Down Numbers: A Step-by-Step Guide
Calculating the total wattage required for your low-wattage landscape lighting plan might seem daunting at first glance, but breaking it down into steps simplifies the process greatly. Begin with identifying how many light fixtures you intend on installing and their individual wattages. This information can be found on product specifications or user manuals provided by manufacturers.
Next, sum up all these individual fixture wattages – this gives you the preliminary total wattage needed for your project. After obtaining this initial number, factor in potential expansions or modifications you might make in the future as previously mentioned (commonly 20%).
This adjustment ensures your system can accommodate growth without requiring complete overhauls or significant changes to the transformer. As you calculate this total, also factor in the length and type of wire you plan on using.
Long wire runs and small gauge (thinner) wires can lead to voltage drop, which should be counteracted by increasing wattage or using larger gauge (thicker) wire. Keep in mind that transformers should operate at around 80% of their maximum capacity for optimal performance and longevity.
Therefore, choose a transformer whose maximum wattage is slightly higher than your calculated total wattage. For instance, if your total landscape lighting power need is 200W, consider opting for a 300W transformer.
In all these calculations, remember that precision promotes efficiency. Being as accurate as possible when calculating your total wattage requirement facilitates a smoothly operating system that delivers desired results while conserving energy.
Master Guide: Install Low-Wattage Landscape Lighting Effectively
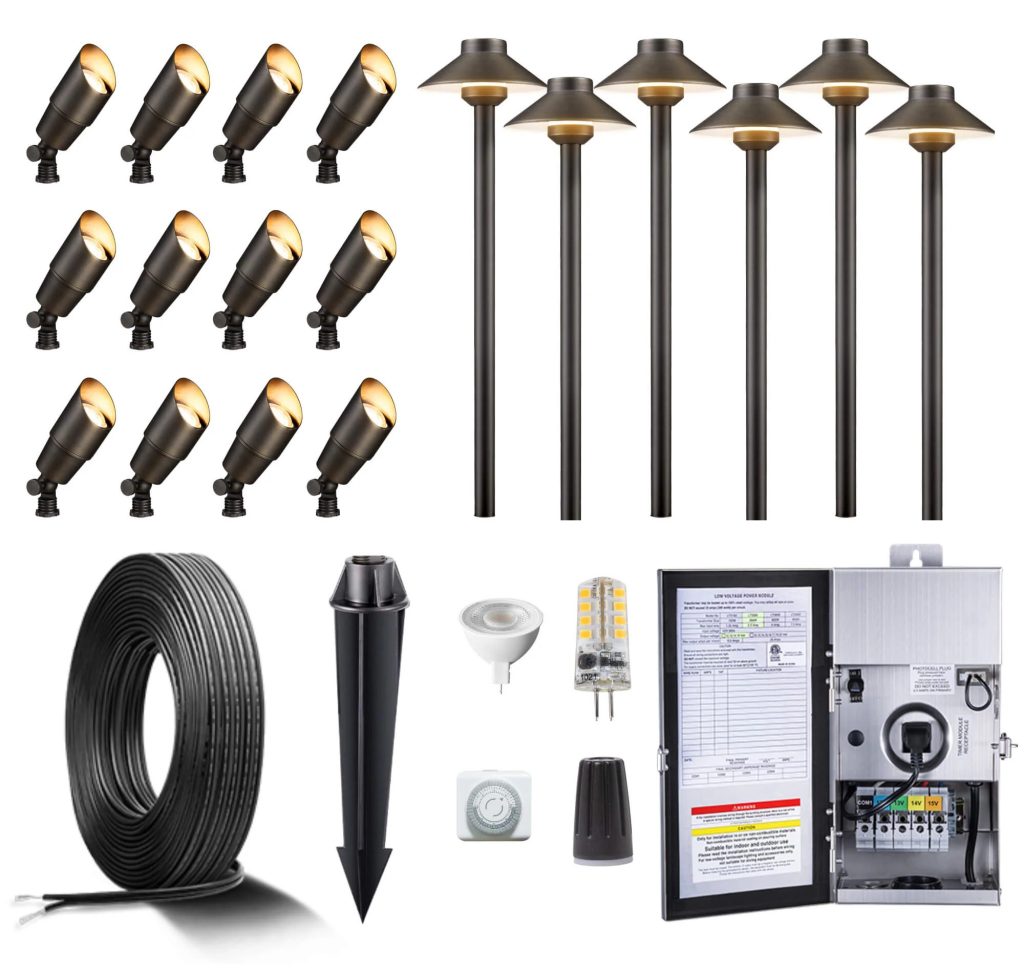
Assembling Your Toolkit: The Essentials for Lighting Installation
Before embarking on the exciting journey of installing low-wattage landscape lighting, it is paramount to assemble a comprehensive set of tools and equipment. With the right tools at your disposal, the installation process can be conducted with ease and precision.
At the top of this list are cable connectors, essential for securely fastening the wires from your lights to their power source. A wire stripper will also be needed to expose sections of wire for these connections. Splicing tools will come in handy in case any wires need to be split or extended throughout your landscape.
Next on this list is a multimeter. This versatile tool measures electrical properties such as voltage and current, making it indispensable when dealing with any kind of electrical installation. It ensures that your system is functioning optimally and safely.
Do not underestimate the importance of having a good set of garden digging tools as well. A sturdy shovel or trenching tool will be necessary for embedding cables beneath the ground surface to maintain an aesthetically pleasing appearance and avoid trip hazards.
Navigating Through Luminary Choices: Secrets in Selecting Superior Landscape Lights
Once you have gathered your toolkit, it’s time to focus on one of the most crucial aspects: choosing high-quality light fixtures that will not only enhance but also endure through changing seasons and weather conditions. The first consideration should always be durability.
Look for fixtures constructed from robust materials like stainless steel or solid brass that can resist corrosion even under harsh weather conditions. These materials may cost more upfront, but their longevity makes them a more cost-effective choice in the long run.
Be mindful also about design compatibility; choose fixtures that complement both your landscape’s aesthetic and purpose. For instance, if you’re intending to use lighting primarily for safety along walkways or steps, look for fixtures designed specifically for this task, like path lights or riser lights.

In addition, consider fixtures that boast features such as adjustability or dimming capabilities. These provide extra flexibility in terms of controlling the intensity and direction of light, perfect for creating different moods or highlighting unique landscape features effectively. Pay close attention to the type of bulb each fixture uses.
LED bulbs are generally favored for their efficiency, longevity, and wide range of color temperatures. They may cost more than traditional incandescent bulbs, but their energy savings over time equate to a lower total cost of ownership.
Choosing quality light fixtures is an investment not just in the visual appeal but also in the safety and functionality of your outdoor space. By dedicating thoughtful consideration to this process, you can avoid unnecessary replacements down the line and enjoy a beautifully lit landscape night after night.
Preparing for Installation: Safeguarding and Groundwork
Safety Measures before Starting the Installation Process
The path to a beautifully lit landscape begins with prioritizing safety. Before launching into the process of installation, it is critical to turn off all power sources to prevent electrical shock. It might seem rudimentary, but having a pair of protective gloves and safety goggles at hand can help prevent accidental injuries.
In addition, understanding your local electrical codes is paramount. These regulations ensure that all electrical work conforms to safety standards designed to prevent fire hazards and other risks. As rules vary by location, contacting your local city office or a professional electrician can provide you with the needed information.
Another significant measure is using only outdoor-rated materials. Be sure that all your lighting fixtures, wires, transformers, and connectors are rated for exterior use. These products are designed to withstand the elements, from moisture to temperature fluctuations.
If you’re not comfortable handling electrical equipment or dealing with any step in this process, don’t hesitate to reach out for professional help. Landscape lighting may be low voltage, but improperly installed systems can still pose a risk. The adage “safety first” should always be at the forefront when undertaking such projects as installing landscape lighting.
Preparing the Ground: Marking Positions and Digging Trenches if Necessary
To avoid running into future problems when installing your low-wattage landscape lights, begin by marking out spots for each of your fixtures on your yard sketch. Use stakes or flags where each light will be placed according to their purpose – path lights along walking areas or spotlights aimed at key features – and make sure they align well with where you want them positioned on your plan.
The next step involves digging trenches for your cables. As a rule of thumb, the depth should be about six inches, but this may vary depending on local electrical codes or the level of foot traffic. The trenches should follow the path marked out in your plan from each light back to the transformer.
While digging, be mindful of other utilities that could be buried beneath your yard, such as irrigation lines, gas lines, or other electrical conduits. Contacting utility companies before digging can alert you to any potential issues and help prevent damaging these services.
When your groundwork is prepared correctly, it sets a solid foundation for an efficient installation process. It’s all part of the plan when ensuring that your low-wattage landscape lights serve their purpose effectively while adding beauty to your outdoor space.
Proper preparation is key in undertaking any substantial home improvement project. By taking time to implement safety measures and prepare the ground adequately for installation, you set yourself up for success in installing low-wattage landscape lighting.
Transformer Installation: The Source of Your Landscape Lighting
The Integral Role of a Transformer in Low Voltage Landscape Lighting
A transformer plays a pivotal role in the operation of your low-wattage landscape lighting. It is the heart of your lighting system, pulsating with an electric rhythm that delivers light to your outdoor sanctuary.
The transformer’s primary function is to convert the standard 120-volt household current into a safer 12-volt or 24-volt current, depending on your landscape lighting needs. In essence, this critical component acts as an electrical bridge, allowing users to safely install and utilize low-voltage lights without the risk of electrical shock or potential damage to their equipment.
This is achieved through electromagnetic induction, where the alternating current (AC) is passed through a coil (primary winding) in the transformer, which then induces a voltage in another coil (secondary winding), effectively lowering the voltage for safe use.
The use of transformers also promotes energy efficiency – one of the prime benefits of low-wattage landscape lighting. By reducing power consumption and regulating voltage supply, transformers limit wastage and ensure that each light fixture receives adequate power for optimal performance.
Beyond safety and efficiency, transformers afford flexibility in design implementation. They make it possible to connect multiple fixtures within one circuit while maintaining consistent light output across all units. Moreover, some transformers come integrated with timers and photocells, offering even more control over your landscape’s lighting.
A Step-by-Step Guide: Installing the Transformer Correctly and Safely
Installing a transformer for your low-wattage landscape lighting may seem daunting initially, but with careful preparation and adherence to safety guidelines, it can be executed proficiently even by novices. Here’s how you do it:
To begin with, select a proper location for installation – preferably close to a ground fault circuit interrupter (GFCI) outlet for ready accessibility during maintenance and in a sheltered place to prevent exposure to harsh weather. The transformer should be mounted at least 12 inches above the ground level to avoid potential water damage.
Once you’ve chosen a suitable location, secure the transformer box onto a wall or post using mounting screws. Ensure that it is firmly affixed for safety and stability. Next, plug your transformer’s power cord into the GFCI outlet, but do not turn it on yet.
Now comes the crucial part – connecting cables from your lighting fixtures to the transformer. Strip off about half an inch of insulation from each cable end using wire strippers and attach these ends to the terminal screws found at the bottom of your transformer. Fasten these connections securely, but avoid overtightening, as it could damage the wires.
Upon successfully making these connections, ensure that any excess cable is neatly tucked away and that all wiring is clear of pathways or lawns to prevent accidents. Check all connected fixtures for proper functioning by switching on your transformer momentarily before finally burying cables or fully installing lights.
This process may involve intricate steps, but remember that patience pays off when installing landscape lighting transformers. Ensuring correct and safe installation goes a long way in maintaining a well-lit garden while preserving its tranquil ambiance.
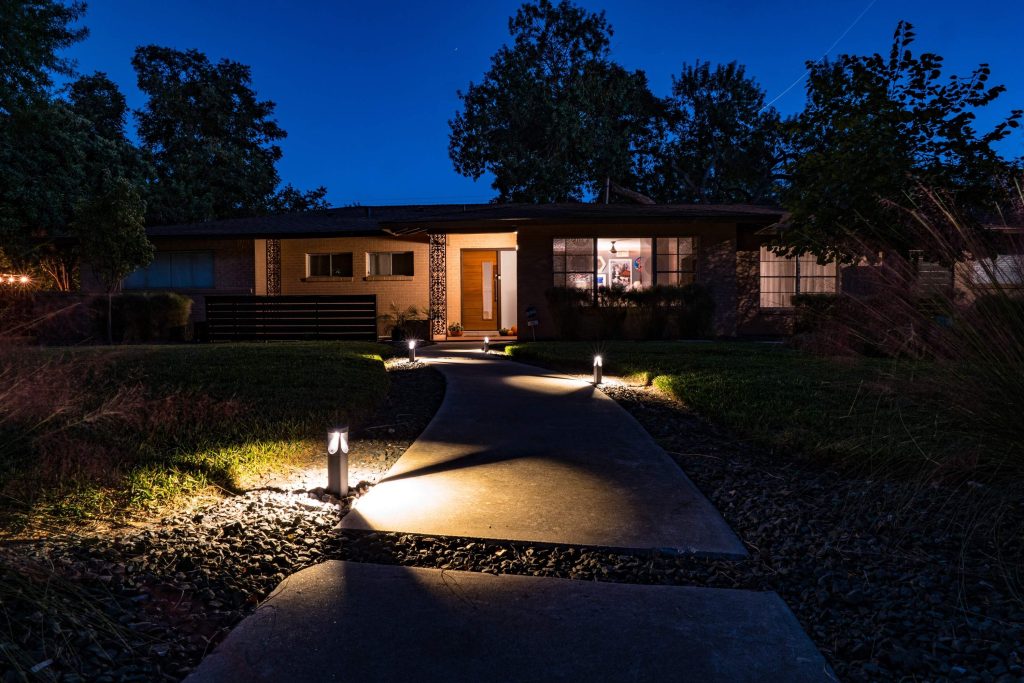
Painting with Light: Positioning Lights According to Your Plan
Positioning your lights correctly is akin to painting a masterpiece with light. It’s all about setting the stage and creating the right ambience.
First, place your fixtures along the paths or walkways, as these are areas that need lighting for safety purposes. Consider having lights every 8-10 feet apart, but remember, your specific landscape might demand variations in this general rule.
Secondly, consider highlighting special features in your garden: trees, shrubs, or an architectural feature of your house like a beautiful arbor or ornamented gate. Use spotlight fixtures for this purpose. The key here is to create visual interest without overpowering the feature you’re trying to highlight.
Furthermore, think about where shadow will be cast by each light and how it will interact with other sources of light in order to achieve balance. Avoid directing any fixtures towards windows, as it may cause unnecessary glare inside the house.
A common practice when installing low-wattage landscape lighting is ‘cross-lighting’. This involves lighting a feature from two different angles, which creates depth and reduces hard shadows that can distort features at night. Don’t forget about functional spaces like outdoor sitting areas or decks; these areas need adequate lighting for comfortable use after sunset but should also blend seamlessly with the overall design scheme of your landscape lighting.
Angles of Elegance: Tips on Adjusting Angles for Best Lighting
Once you’ve positioned your lights according to your plan, it’s time to adjust their angles for optimum lighting – yet another crucial element in conjuring up a nocturnal wonderland in your backyard! Start by aiming each fixture at its intended target during the daytime so that you can easily see where light will fall later. However, expect some fine-tuning under actual night conditions, as what works during daylight might need adjustment when darkness falls.
For path lights, look to achieve a soft pool of light that illuminates the path without blinding visitors or creating deep, confusing shadows. Path lights are best angled straight down or slightly outwards and should always be positioned in such a way that the bulb itself is never directly visible.
Spotlights used for accenting features should be angled in such a way that they wash the intended feature with light without producing a harsh glare. Aiming for an angle of 30 degrees from ground level towards your feature is generally a good starting point.
However, every garden or outdoor space has its own unique topography and morphology and therefore requires experimentation to find the perfect angle. If you’re lighting an outdoor sitting area with downlighting from surrounding trees or other high structures, ensure you adjust angles so that light does not shine into people’s eyes directly.
Instead, aim for evenly distributed lighting within this space by positioning fixtures strategically high above the ground and angling them downwards towards the seating area. Implementing these tips on adjusting angles will ensure your landscape lighting design is both functional and aesthetically pleasing.
Connecting the Lights
A Detailed Guide on Wiring Connections: Series vs Parallel Circuits
To fulfill your landscape lighting installation, you must understand the difference between series and parallel circuits. In a series circuit, the current has only one path to follow. Each light is dependent on the other; if one goes out, they all fail. This system is seldom used in landscape lighting due to this disadvantage.
Conversely, a parallel circuit offers each light its own direct route to the power source. This means that each light operates independently; if one fixture burns out or experiences issues, the others will continue to shine brightly, unaffected. Thusly, for most landscape designs, parallel wiring provides greater reliability and flexibility.
Now that we’ve identified our preference for parallel wiring, let’s delve into how to accomplish it. Begin by laying your cable along the path you have chosen for your lights. Strip back enough insulation from each end of the wire so that you can make solid connections with your fixtures and power source – typically 1/2 inch will suffice.
Next comes connecting your fixtures. Depending on their design, this may involve screw terminals or wire nuts; always refer to manufacturer instructions for specifics here. However you connect them, ensure that positive connects to positive and negative connects to negative; mixing these up can result in damage or failure of your lights.
Connect your main wire back to your transformer following similar procedures as above – again observing correct polarity connections – then secure any loose cabling with stakes or clips as appropriate.
Ensure Proper Electrical Flow
With all connections made now is an apt time to test everything before finalizing our installation – let’s ensure we have proper electrical flow throughout our system. Firstly, check that there are no obvious signs of improper connections, such as sparking or unusual noises emanating from either lights or transformers, when everything is powered up; if there are, immediately switch off and correct these.
Next, take a multimeter and set it to measure voltage. Touch the probes to your transformer output terminals; you should get a reading close to its rated output (usually 12 volts for low-voltage systems). Then check at each light in turn; this should also give you a similar reading proving that power is flowing correctly.
Don’t worry if the readings are not absolutely identical; given the nature of electricity flowing through resistance, some slight drop is normal. However, if there’s too much variance, then it would be worth checking connections again or even considering additional transformers to ensure all lights receive adequate power.
Look at your lights themselves; they should all be shining brightly with no flickering or other signs of inconsistency. If they shine, then congratulations! You’ve successfully installed your low-wattage landscape lighting system!
Conclusion: How to Install Low-Wattage Landscape Lighting?
This concludes our exploration of installing low-wattage landscape lighting, from understanding the benefits of such systems to planning the layout, evaluating power requirements, and carrying out the installation step by step. Through thoughtful planning and meticulous execution, you have embarked on a venture that will beautifully illuminate your space while conservely using energy resources.
Remember, while avid do-it-yourselfers can undoubtedly accomplish this task with relative ease and satisfaction, don’t hesitate to consult or hire professionals for more complex jobs or when in doubt about certain aspects. After all, safety should always take precedence over aesthetics.
Let your landscape shine brightly under its new lighting setup, with each carefully selected bulb casting pleasant shades on your cherished spaces during the coveted twilight hours. As you survey the fruits of your labor under this soft lighting, feel proud that not only have you added an appealing touch to your property but also a layer of safety and functionality for many delightful evenings to come.
You may also be interested in the following posts: