Gloaming Lights: An Overview of Landscape Lighting
As day turns to night, the twilight slowly shrouds our surroundings, taking with it the vibrant colors and intricate details that our eyes feast upon during daylight hours. Yet, there is a way to extend this visual enchantment into the evening and beyond. The answer lies in landscape lighting.
Landscape lighting refers to the use of outdoor illumination for gardens, yards, parkways, and exterior settings generally purposed for aesthetic appeal, safety, access, or social and event uses. It is a masterstroke that illuminates your outdoor spaces artfully: trees are given depth; architectural elements are highlighted; pathways are visibly marked.
Effectively implemented landscape lighting should be an enchanting mix of drama and subtlety that enhances your nighttime experiences. It’s not simply about throwing light haphazardly around your yard. Rather, it’s more akin to painting a picture with light – utilizing its nuanced shades to craft an organic tableau illuminated by tasteful highlights and shadows.
Intricate as they may seem on first glance, these systems can range from simple DIY installations to complex configurations needing professional expertise. The end result, however, is always worth it – a beautifully accented terrain when natural light fades into darkness.
With myriad options available in today’s market place – each type capable of casting different intensities and hues – it offers homeowners unlimited creative possibilities. Whether you want a soft romantic glow around a garden walkway or focused beams highlighting your house’s architectural features – landscape lighting provides you all this flexibility.
The Bright Side: Importance and Benefits of Landscape Lighting
In addition to providing aesthetic enrichment to your property after sunset, landscape lighting also boasts other tangible benefits that make it an investment worth considering for homeowners. Firstly, security is a crucial consideration. Well-lit exteriors can deter potential intruders by eliminating dark corners and shadows that might otherwise provide cover. Motion sensor lights can surprise unwanted visitors, discouraging them from venturing further.
Secondly, landscape lighting significantly improves safety by illuminating paths, steps, and obstacles – preventing potential accidents in low-light scenarios. It also allows you to utilize your outdoor spaces fully even after dusk – be it for late-night barbecues or garden parties.
Moreover, from a financial standpoint, tastefully lit exteriors can increase the visual appeal of your property, thereby potentially augmenting its market value. It showcases the house in its best light (literally), emphasizing the architectural features and landscaped areas. In essence, landscape lighting enhances visual appeal while providing functionality – it reflects thoughtful attention to detail while ensuring safety and security for both inhabitants and guests alike.
A Symphony of Shadows: Different Types of Landscape Lighting
The beauty of landscape lighting lies in its diversity – from broad floodlights casting wide swaths of light to slender spotlights pinpointing a specific detail – each type serves a unique purpose. Understanding these various types will unlock nearly limitless potential in crafting your desired nighttime ambience.
Floodlights are ideal when broad illumination is required over larger areas, such as driveways or patios. Their wide beam spread provides general lighting over a large space, making them an efficient choice for practical applications like safety and security.
If you’re looking to highlight specific features like statues or trees, then spotlights are your go-to choice. With their narrower beam spread, they create focal points, drawing attention towards the illuminated object while simultaneously creating shadows for depth perception.

To illuminate pathways or garden beds with softer ambient lighting, consider using path lights. Positioned at ground level, these provide localized lighting. They are mostly used for marking out paths but can also create enchanting low-level lighting across your garden.
For those looking to up the artistic quotient by playing with light and shadows, consider using in-ground well lights. Recessed into the ground, they can discreetly uplight features without drawing attention to the light source itself, thereby creating dramatic shadow plays on walls and other structures.
Landscape lighting offers a plethora of options to cater to various needs and preferences. By understanding how each type works, you can mix and match these to create a unique balance between aesthetics, safety, and utility in your outdoor spaces.
Understanding the Basics of Electrical Connections
A Primer on the Fundamentals of Electricity
Before delving into the artistry of landscape lighting, it is imperative to comprehend some rudimentary principles of electricity. In its essence, electricity involves the movement of electrons from one point to another through a conductor. This flow generates energy to turn on the exterior lights.
The first principle is voltage, often denoted as V. Voltage is akin to electrical pressure pushing electrons (electrical charge) through a conductor such as a wire or cable. When relating this concept to landscape lighting, think of voltage as the force driving electricity from your main power source (transformer) to your lights.
The second principle is current, symbolized as I, which refers to the rate at which electric charge flows past a point in a circuit. In essence, current denotes how many electrons are moving through the wire per unit time. The measurement unit for current is amperes, or amps (A).
Resistance impedes electron flow and reduces both voltage and current in an electrical circuit – an integral consideration when planning long runs of wiring for outdoor lighting designs. Its unit is Ohm (Ω).
It’s pivotal you grasp these principles since they interrelate via Ohm’s Law: voltage equals current times resistance (V = I x R), shaping your landscape lighting installation.
Alternating Current vs Direct Current Power in Landscape Lighting
Now that we have a foundational understanding of electricity, let’s delve deeper into two types: alternating current (AC) and direct current (DC). They differ chiefly in directionality – AC reverses direction periodically while DC maintains constant directionality.
Low-voltage landscape lighting systems often use alternating current from residential outlets that has been converted to 12 volts using a step-down transformer. Recently, direct current gained popularity because LED lights – increasingly becoming the go-to choice for landscaping lighting – are inherently DC devices.
They convert power internally from AC to DC, leading some installers to use DC transformers initially to enhance efficiency. When choosing between AC and DC, it’s also essential to consider voltage drop – the reduction in voltage in your electrical circuit that happens when current travels through wire (resistance).
With longer wire runs common in landscape lighting setups, voltage drop under DC power is significantly higher than with AC. Hence, if you’re designing a large landscape lighting system with long cable runs, you may prefer an AC setup even if using LED lights.
Safety Precautions when Working with Electricity
Irrespective of the type of electrical system you decide on for your outdoor lighting design, safety remains paramount. Even though low-voltage outdoor lighting systems pose less risk than their high-voltage counterparts, do not equate this to mean no danger at all.
Here are some safety precautions to heed while installing your landscape lights. Firstly, wear suitable personal protective equipment (PPE), which includes rubber gloves and boots. This minimizes the chance of accidental electrocution during installation or maintenance.
Secondly, never work on live circuits. Always ensure all power supplies are switched off before beginning any work. If working near water bodies like pools or fountains, be extra cautious since water is a conduit for electricity and can lead to serious accidents even with low voltages involved.
Thirdly, use only outdoor-rated materials and equipment designed specifically for ground burial when connecting landscape lights outside where they could be exposed to moisture or accidentally dug up. But most importantly, if you’re unsure about any aspect of your electrical installation, consult a licensed electrician instead of attempting DIY solutions that might put yourself or others at risk.
Tools and Equipment for Landscape Lighting Installation
In embarking on the voyage of landscape lighting installation, one must be equipped with the right tools and materials. Among these are a transformer, which is the power source for your lights; electrical cable to distribute power from the transformer to each light fixture; a wire stripper to ensure safe and effective connections; landscape lighting fixtures themselves (spotlights, path lights, floodlights, etc.); stakes or mounting hardware to secure fixtures in place; silicone-filled wire nuts specifically designed for outdoor use; and a spade for digging trenches.
While traditional tools are required, we must also delve into variations of light fixtures that can be utilized to enhance your outdoor aesthetics. Spotlights can be utilized to emphasize specific features, such as trees or architectural details. Path lights serve dual purposes – providing safety while also highlighting your garden pathways. Floodlights are powerful luminaries that provide widespread illumination for larger areas or accents.
The Duality of Power: Solar vs Wired Lights
In our modern era of environmental consciousness and technological innovation, there’s more than one way to illuminate an exterior space. One may opt for traditional wired lights that link up with your home’s electrical grid or choose solar-powered options that harness energy from the sun. Both have their unique benefits: wired systems often offer more consistent lighting and can operate independently of weather conditions, while solar-powered systems contribute towards energy efficiency and require less setup due to their lack of complex wiring.
Designing Luminary Landscapes: Planning Your Lighting Scheme
The onset towards creating an enchanting landscape lies not only in choosing the right equipment but largely in meticulous planning too. To begin with, identify what purpose you want your lighting scheme to serve – whether it’s highlighting aesthetic features, ensuring safety and security, or perhaps both.
Sketch out a plan detailing key features such as driveways, paths, architectural designs, trees, pools, or plants you’d like to highlight. With your sketch in hand, decide on appropriate light fixtures for each area depending on their purpose and visual appeal. The final stage of planning involves calculating the total wattage required by adding up the wattages of all lights planned to be used.
The Radiant Pathway: Installation Process
Let us now explore the landscape of the installation process. Firstly, installing a transformer requires choosing an accessible yet discreet location near an exterior GFCI outlet for ease and safety. Mount it at least 12 inches above ground level to protect it from flooding. Connect it by attaching the cable’s wire ends to the terminals of the transformer.
For laying out low-voltage cable, achieve this by trenching along where your lights will be placed with a spade or lawn edger at least 6 inches deep for safety. Upon connecting your cable to the transformer, install your chosen light fixtures along their planned locations and connect them to the main cable with silicone-filled wire nuts.
Solar-powered landscape lights require proper sunlight exposure; thus, locate them away from shading trees or buildings. Installation is easy, as they often come with stakes that can simply be driven into the ground.
Connecting Wires to the Light Fixtures
Each light fixture will have either pre-attached leads or a terminal for wiring. The physical connection between the cable and each fixture usually involves one of the following connectors:
Pierce/Clamp Connectors (Quick-Connect Clips)
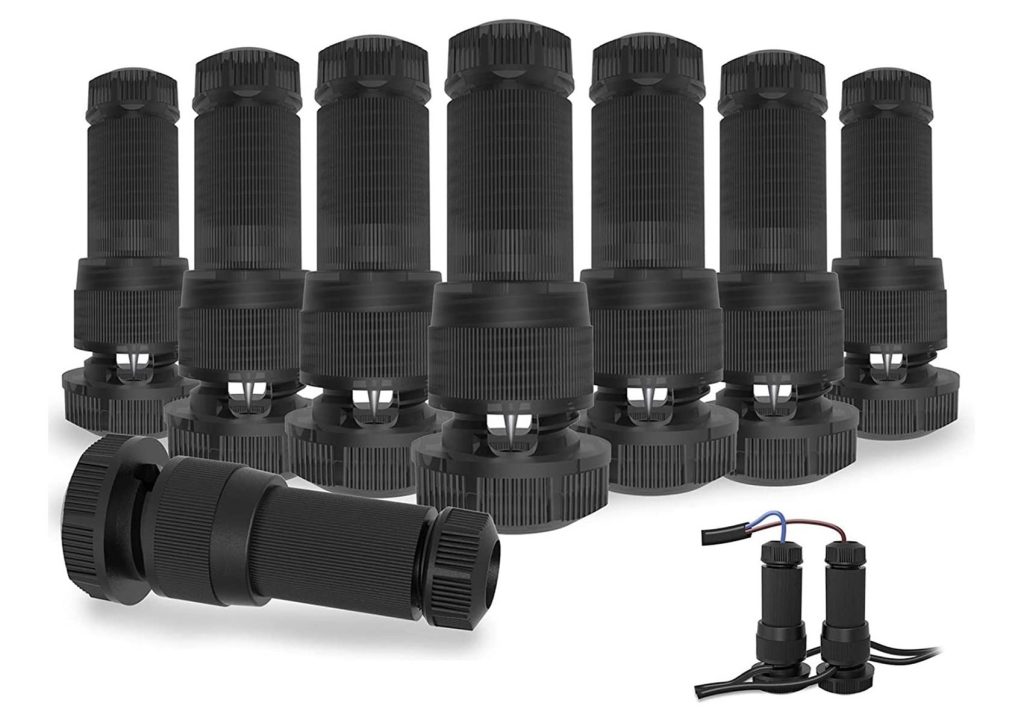
These are the most commonly used connectors for landscape lighting, often pre-included with many lighting kits, as they are quick and do not require cutting the main cable. They work by clamping onto the main low-voltage wire and piercing through the wire’s insulation to make the electrical connection without cutting or stripping the wire. The connectors are placed over the main wire and are either snapped or screwed down to create contact.
Waterproof Wire Nuts (Gel-Filled or Silicone-Filled)
In some cases, you’ll need to manually splice the wires. Strip about 1/2 inch of insulation from both the main low-voltage wire and the fixture’s wire leads. Twist the wires together, and then secure them with a waterproof wire nut. These are very popular for landscape lighting because they offer a reliable connection while providing waterproofing.

Similar to traditional wire nuts, which require manually stripping the wire before connection, these connectors are filled with silicone or gel to waterproof the connection, preventing moisture from corroding the wire over time. After twisting the wires together, the gel or silicone inside the wire nut surrounds the wire ends, creating a weather-resistant seal.
Crimp/Heat-Shrink Connectors

These connectors are cylindrical tubes with heat-shrink insulation. The wires are crimped into the connector, and then heat is applied to shrink the tube, creating a weatherproof seal. After inserting the stripped ends of the wires into the connector, you crimp the metal sleeve inside to hold the wires together.
Applying heat causes the outer sleeve to shrink and seal the connection. This provides a very strong, durable, and waterproof connection. Crimp/heat-shrink connectors are used in permanent installations where a highly secure and waterproof connection is needed.
Push-in Connectors
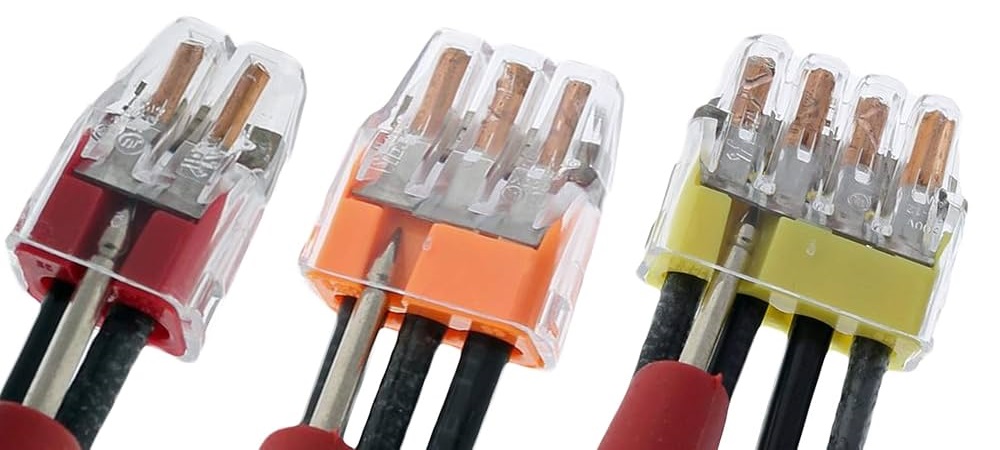
Push-in connectors have small holes where you insert the stripped ends of the wires, and an internal clamp mechanism holds the wire in place. Once the wires are pushed into the connector, internal clips grip the wire and maintain electrical continuity. Simple to use, no twisting or crimping required, offers a quick and easy connection. Push-in connectors are used for rapid installation of landscape lights, especially in systems designed with push-connect technology.
Securing the Connections
Use zip ties or cable clips to secure the cables to stakes or other fixed objects to keep them in place and organized.
Testing the Landscape Lights
Once all the lights are connected, turn on the transformer to test the system and check each light fixture to ensure it is working correctly. If some lights don’t work, double-check the connections, ensuring they’re tight and properly made. By following these steps, the physical connection between the landscape lights and their power source ensures a safe, functioning low-voltage outdoor lighting system.
Path of Luminary Challenges: Troubleshooting Common Issues
Like any journey, tackling landscape lighting also has its share of hiccups. Common issues include dim lights due to overloading circuits or faulty bulbs; inconsistent lighting caused by corrosion; burned-out bulbs, etc. However, armed with knowledge and the right tools, these can easily be rectified, ensuring a smoothly lit pathway towards your lighted dreamscape.
Conclusion: How to Connect Landscape Lighting?
The journey towards creating a perfectly lit landscape might seem daunting initially, but fret not! With careful planning, appropriate tools and materials, coupled with understanding basic electrical connections, anyone can master this art form. Embrace this opportunity as not just another home improvement project but a chance to unleash your creativity, heighten your home’s aesthetic appeal, and possibly create a sanctuary that glows with your unique signature style.
You may also be interested in the following posts: